This guide explains how to upload your 3Dvista virtual tour to XROO and easily host it online. By following these steps, you can quickly generate a tour URL and share your immersive experience on the web.

Step 1: Export Your 3Dvista Virtual Tour
Before hosting your virtual tour, it must be exported from 3Dvista in a web-compatible format.

Recommended Files
•
Ensure your virtual tour is functioning properly before exporting it. Use the Web Output feature in 3Dvista to generate the necessary files. These files should include the index.htm file and all related resources to ensure proper functionality on the web.
Export Settings
•
Web Output: Creates web-ready files for hosting.
•
Recommende Files
◦
Confirm that the exported folder contains the recommended files listed above
▪
index.htm: The main file to launch the tour in a web browser.
▪
media folder: Contains resources such as images and videos.
▪
Other scripts & configuration files(.js): Support essential tour functionalities.
Check Exported Files
•
Ensure that your exported folder structure looks like this
├── index.html
├── /media (Resource folder - images, videos, etc.)
├── /js (JavaScript folder - supports tour functionalities)
Maintain a flat folder structure with no nested directories. This helps ensure all resources load correctly.
Step 2: Upload Files to XROO
Once your virtual tour files are exported from 3Dvista, follow these steps to upload them to XROO.
1.
Login to XROO: Sign in to your XROO account.
2.
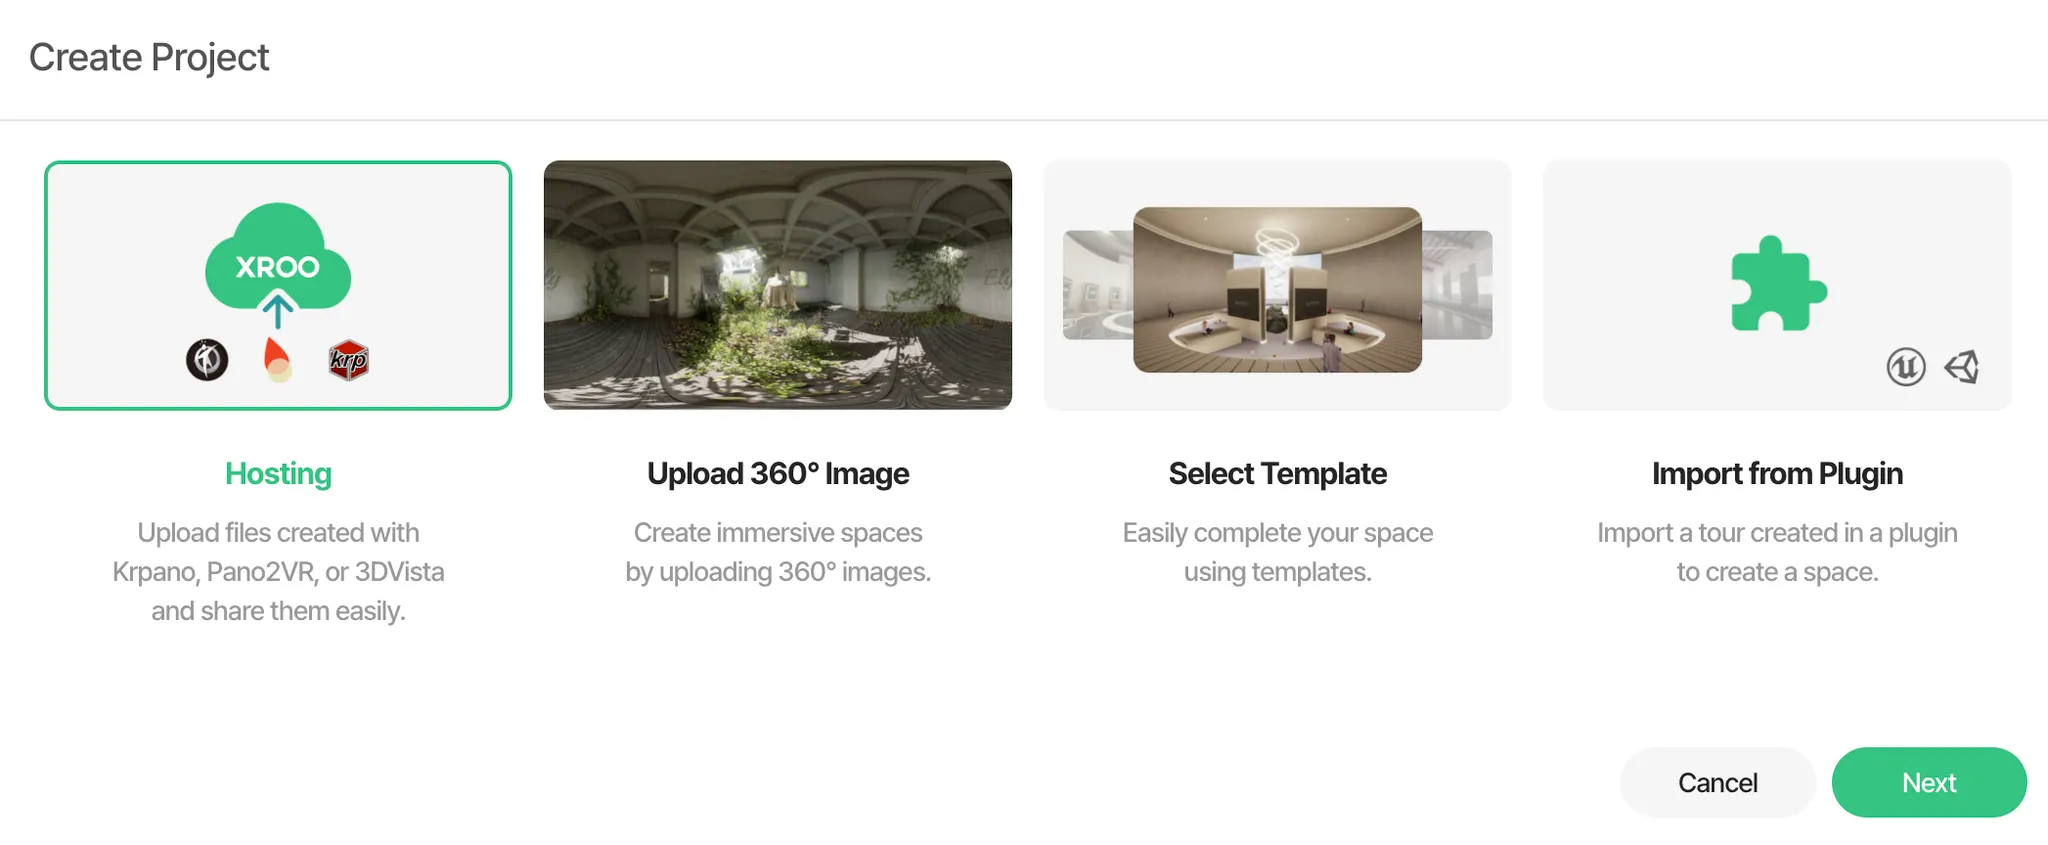
Create a New Project: Navigate to the "Create Project" menu and select the "Hosting" option.
3.
Upload Files: Select and upload the entire folder containing the exported 3Dvista virtual tour files. Ensure the folder includes the index.htm file. You can upload the folder directly or compress it into a .zip file for convenience.
3-1. ZIP File
 Correct Compression Method
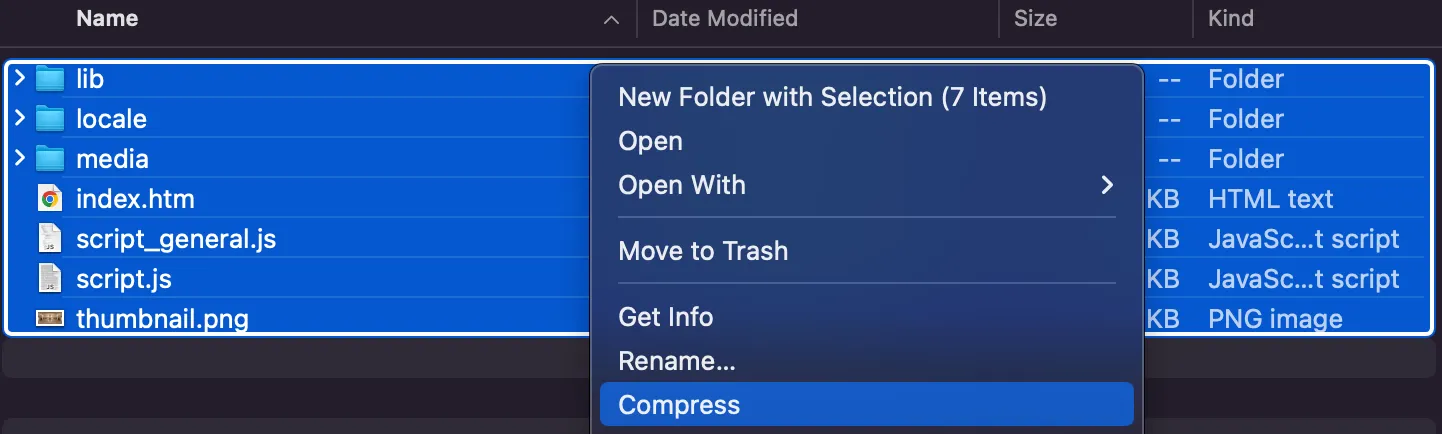
•
Ensure that all resources such as index.html, /media, /js, etc., are located at the root level.
•
As shown in the image below, compressing all resources in a flat structure into a ZIP file and uploading it will allow the tour to function correctly.
 Incorrect Compression Method: Resources Are Nested Inside a Subfolder
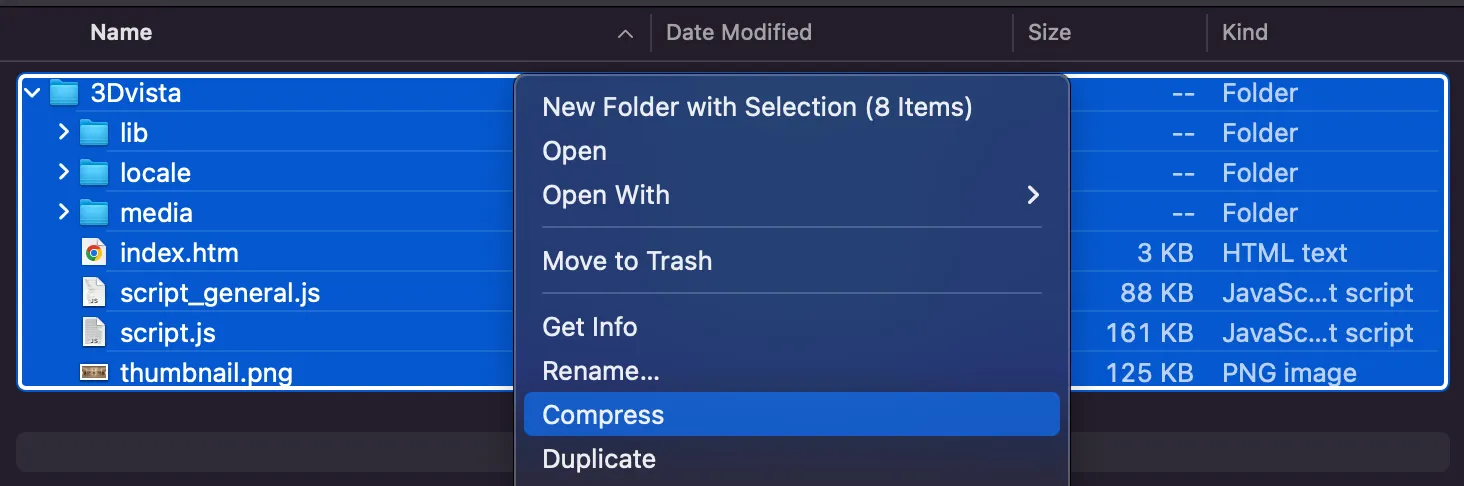
•
As shown in the image below, if the resources are placed within a subfolder (e.g., 3Dvista) and then compressed, the tour will not function correctly.
3-2. Folder
Make sure to avoid nesting the resources inside any additional folder to ensure proper functionality.

※ Important Notes
•
While not mandatory, including the recommended files (index.htm, /media, /js) ensures the best hosting experience.
•
Maintain the original folder structure as exported from 3Dvista.
•
Avoid changing file paths or creating nested folders.
4.
Generate the Tour Link
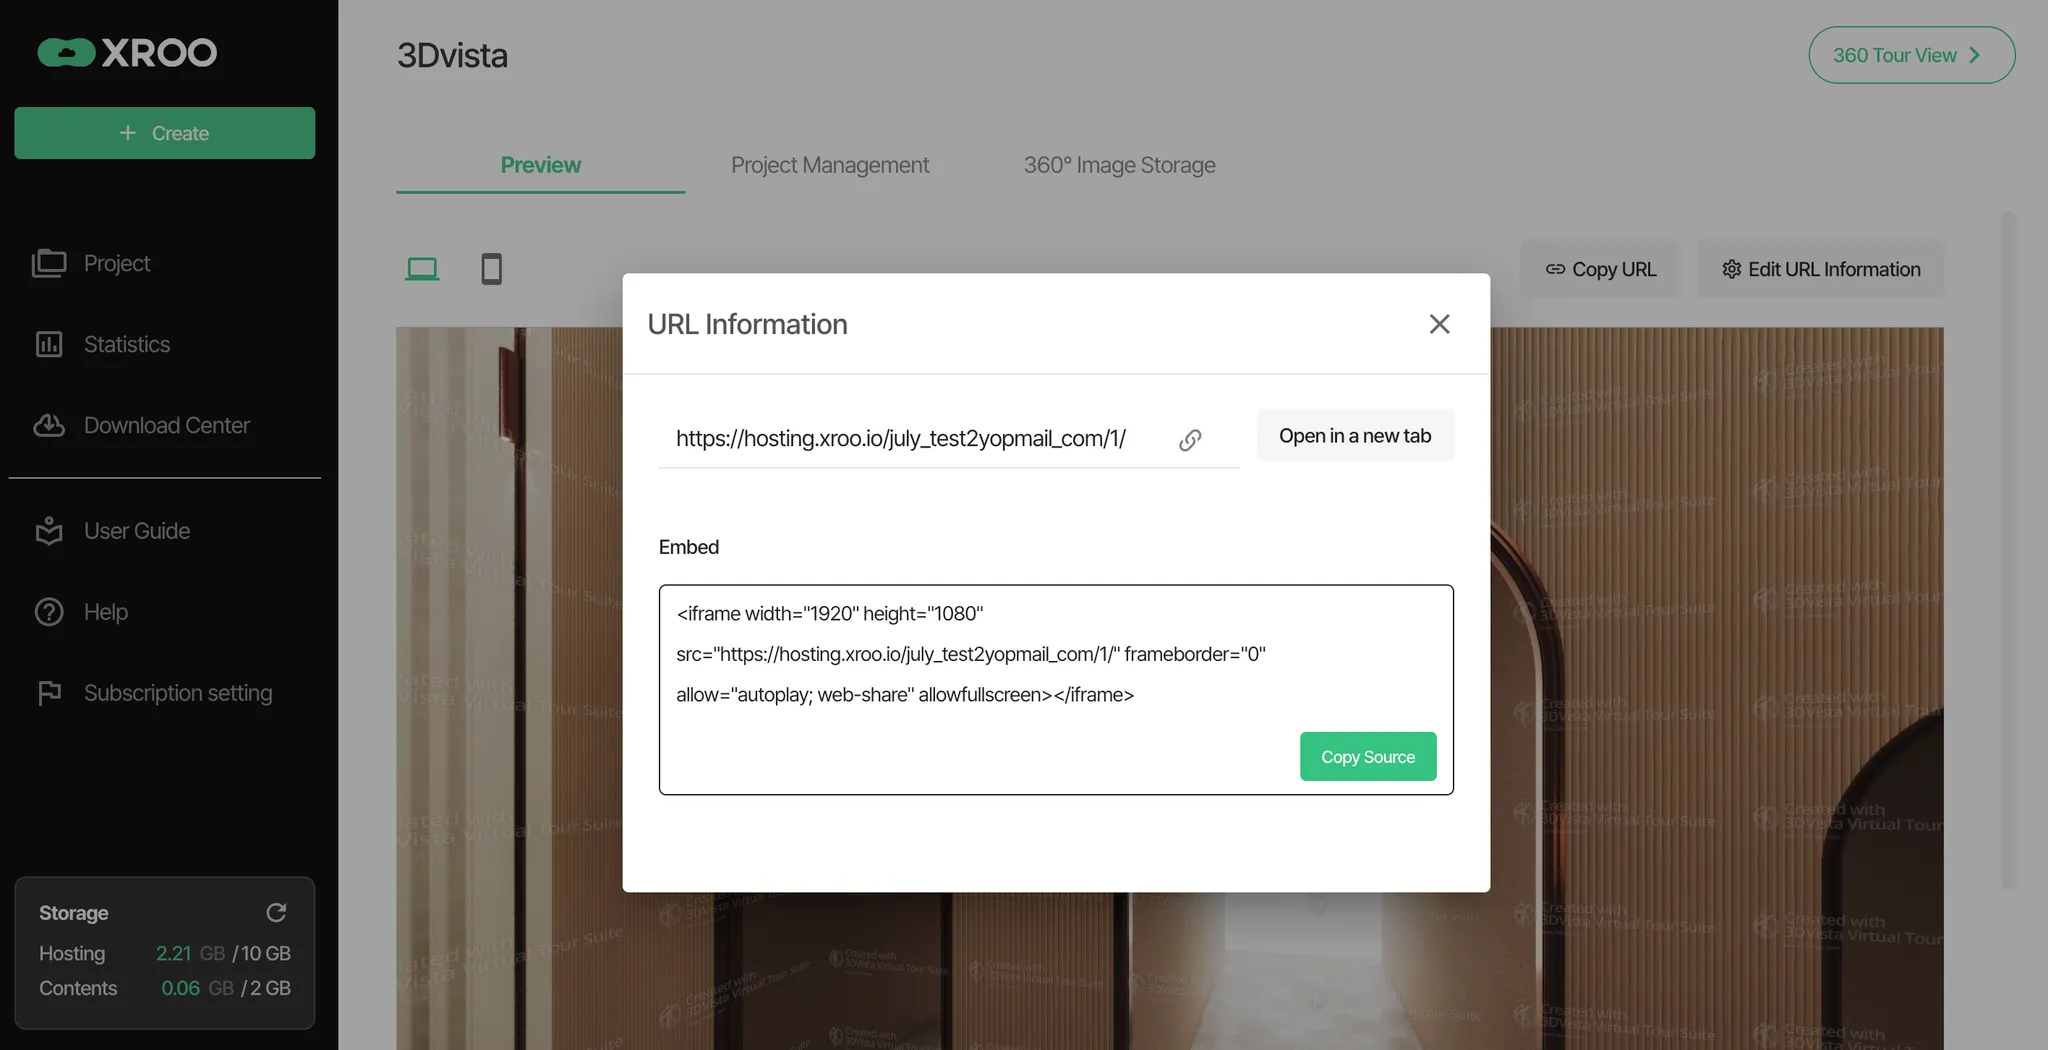
Once the upload is complete, XROO automatically generates a unique URL for your virtual tour. This URL allows you to access and share your tour instantly on any web browser.
Step 3: Preview and Share Your Tour
After uploading your files to XROO, follow these steps to preview and share your virtual tour.
1.
Check the URL
Once the upload is complete, go to the project details page to view the generated URL.
2.
Launch the Tour
Click on the URL to open and view the virtual tour in your browser.
Example URL: https://hosting.xroo.io/sitename
3.
Share the Tour
Share the generated URL with others via email or social media.
Embed the tour URL on your website for a seamless user experience.
※ Additional Notes
File Size: If the exported virtual tour files are large, the upload may take some time. Please wait until the upload is fully completed.
Maintain Folder Structure: Ensure the folder structure is as follows
├── index.htm
├── /media
├── /js
Do not include nested folders, and keep the structure exactly as exported.
Browser Compatibility: The URL provided by XROO is compatible with all major web browsers. For the best viewing experience, use the latest version of your preferred browser.