


You must ensure that the "XROO Unreal Engine Plugin" compatible with your version is installed.
↓Plugin Download↓
What is an Unreal Engine Plugin?
XROO Unreal Plugin is a program that extracts content created with Unreal Engine into a data format that can be edited and distributed on XROO, automatically creating tours on the XROO platform.
This guide explains how to install and run the XROO Plugin for Unreal Engine to create XROO tours.
Before using the plugin, set up the basic development environment as outlined below.
Setting up the Development Environment
1. Download and install Unreal Engine version 4.24 or higher.
2. Download and install MS Visual Studio.
Tip: You do not necessarily have to follow the steps in the order described in the guide below.
After installing the plugin, you can use the features provided by the XROO plugin—such as placing content and creating & loading tours—in a way that suits your personal workflow. The following guide is structured to provide an overview of the XROO plugin's features, so please refer to it as needed for your tasks.
1. Plugin Installation / Execution / Login
How to Install the XROO Plugin

1.
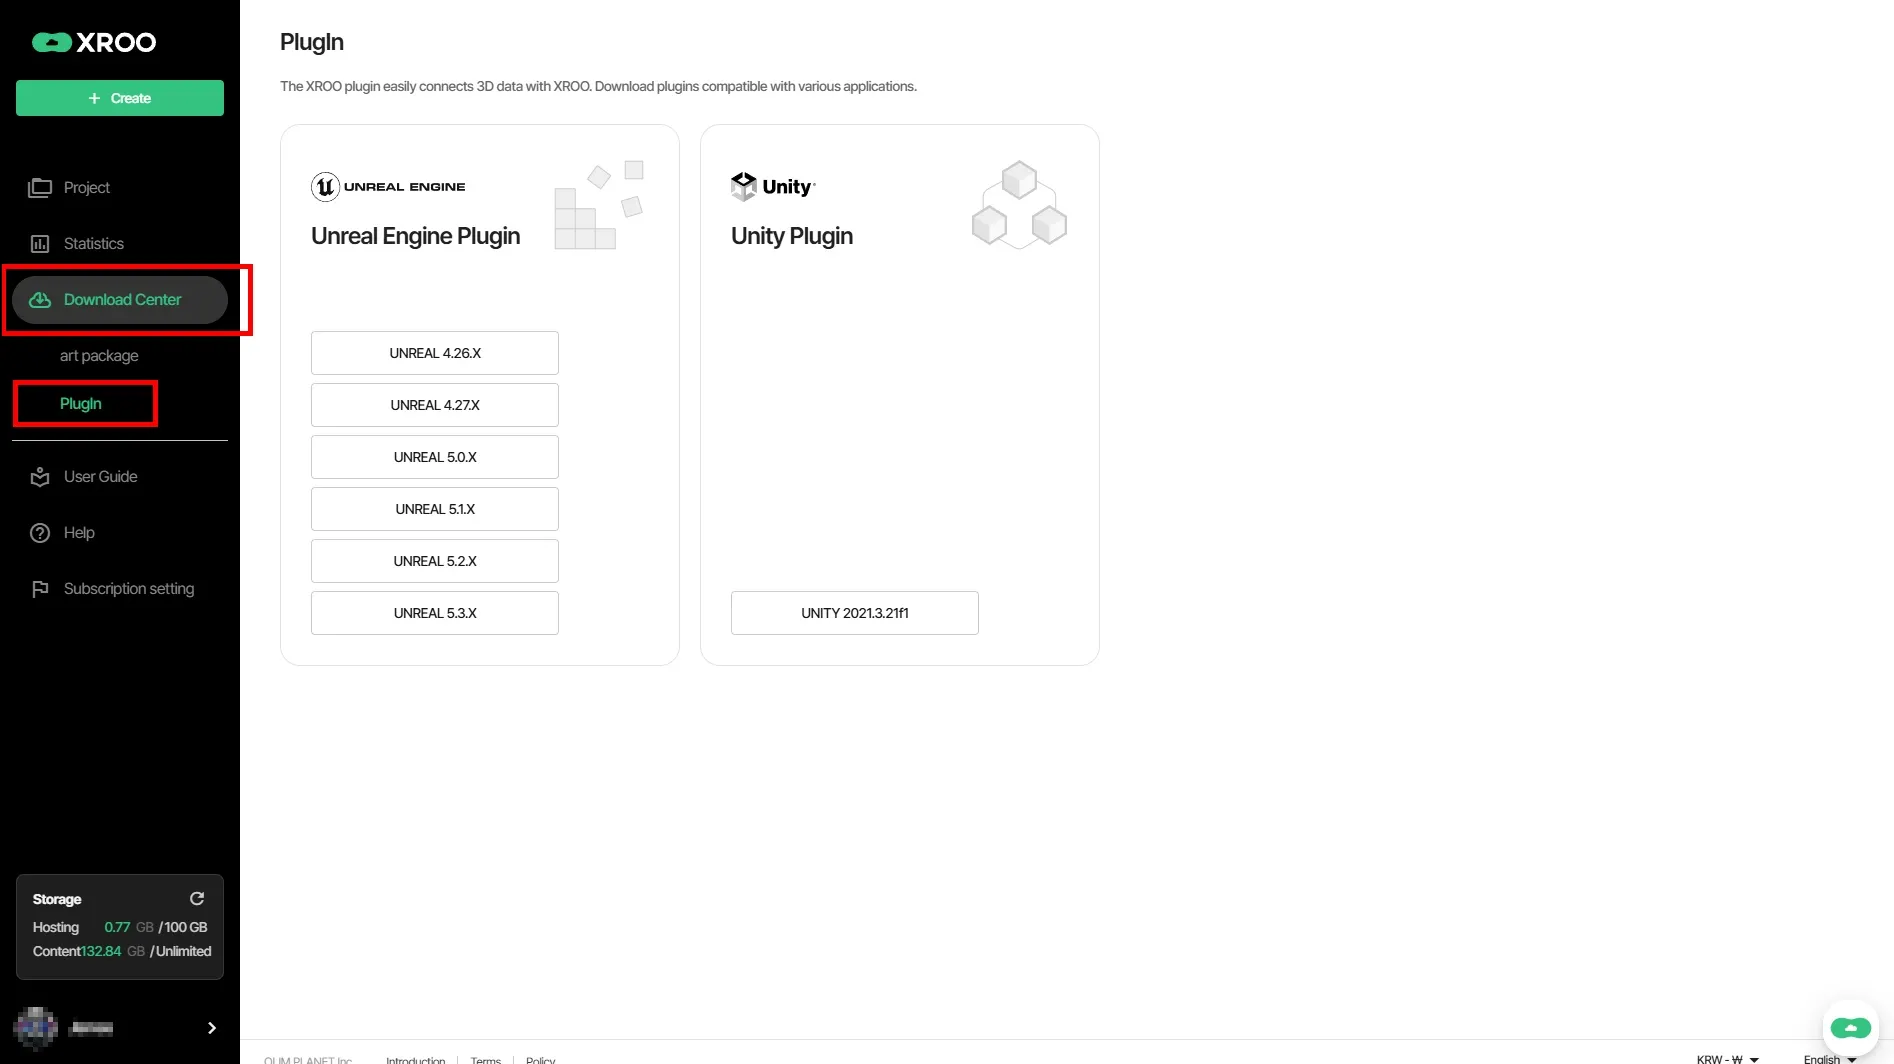
Log in to XROO and click on "My Projects" → "Create Content" → "Download Center" in sequence.
2.
Click on the "Plugin" submenu.
3.
Download the plugin that matches the version of Unreal Engine you are using.
Importing the XROO Plugin
•
Copy the plugin folder that you downloaded and extracted to the project folder you want to work on.
◦
The project folder name (the project you want to work on) must be in English for the XROO plugin to function properly.
•
Create a 'Plugins' folder in the project folder (if this folder already exists, you can skip this step), and copy (move) the downloaded XROO plugin file into the Plugins folder.
•
Launch Unreal Engine, and open the project where the plugin was installed.
•
When you open the project, you can confirm that the XROO plugin has been installed/created in the toolbar.
◦
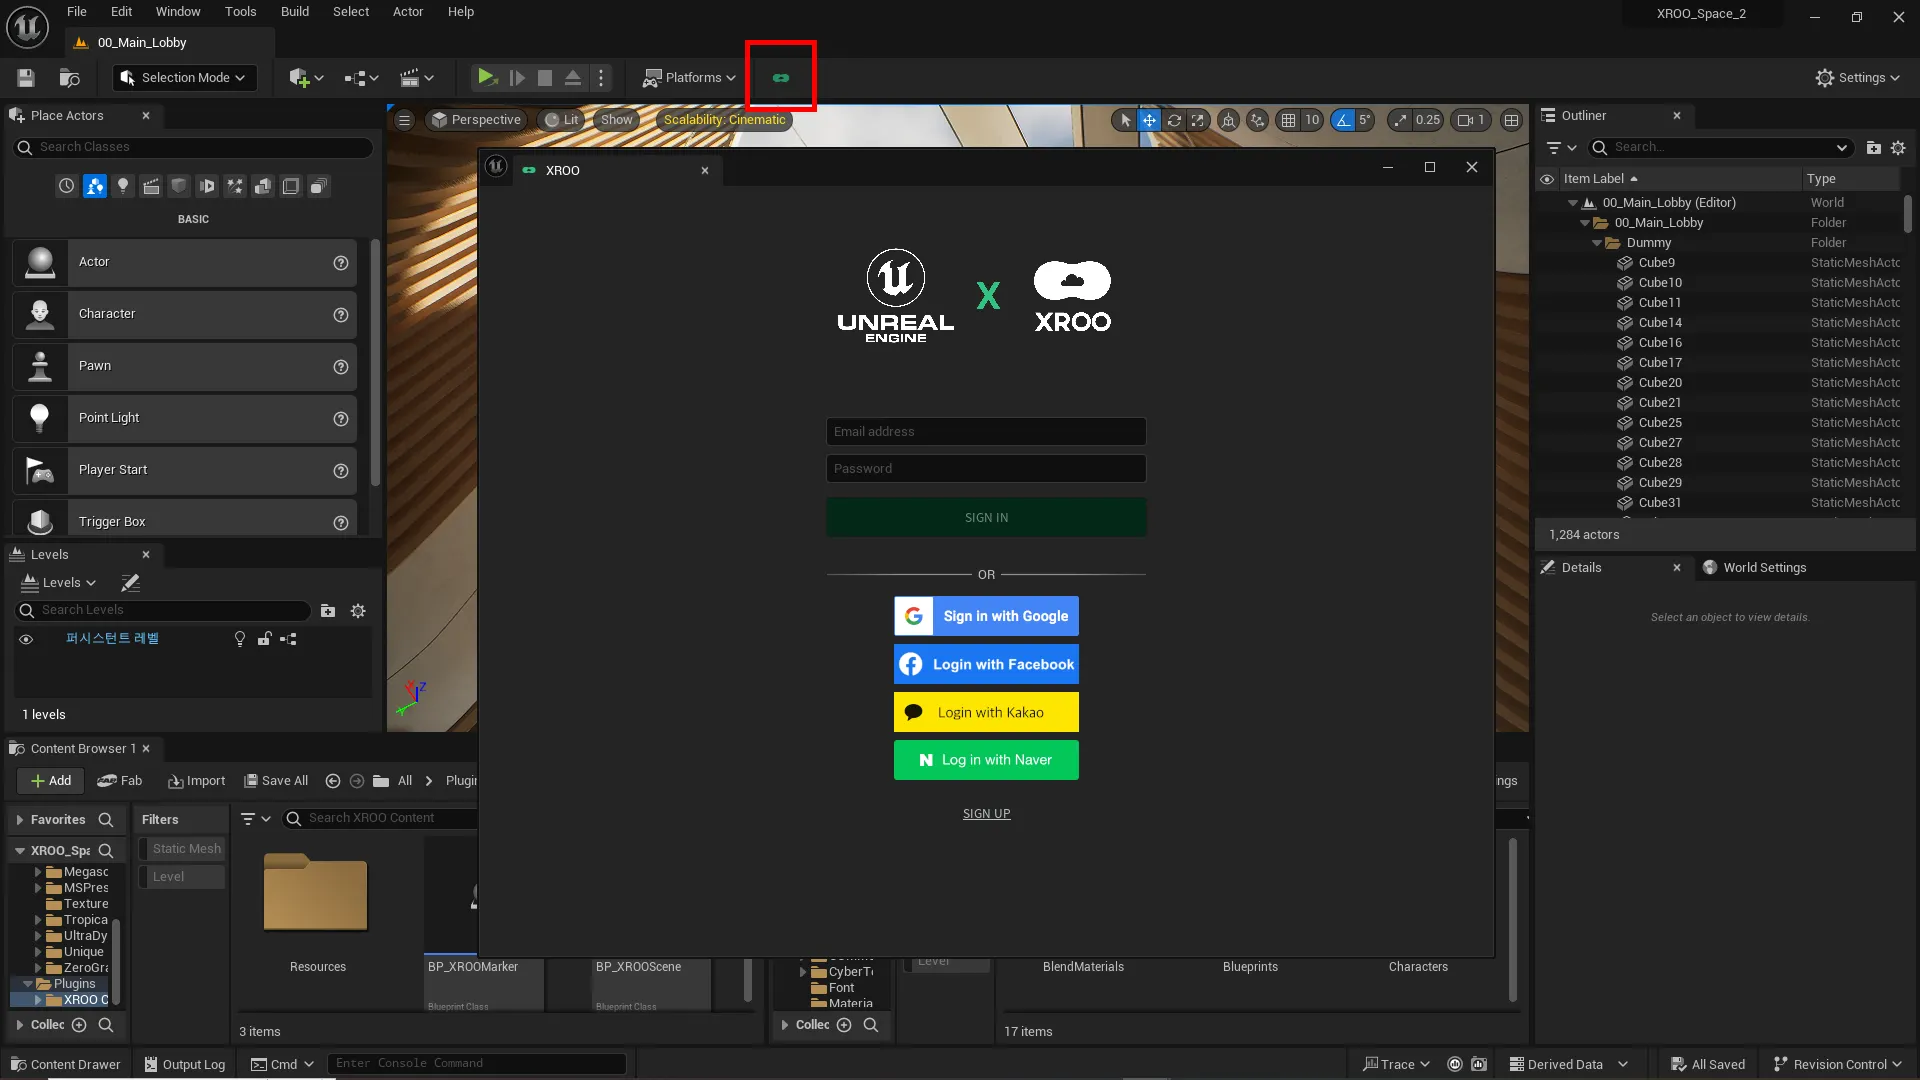
Clicking the plugin icon will display the login window.
◦
You can log in using the same account (Google, Facebook) as used on the XROO website.
◦
You must log in to create a tour on XROO through the plugin.
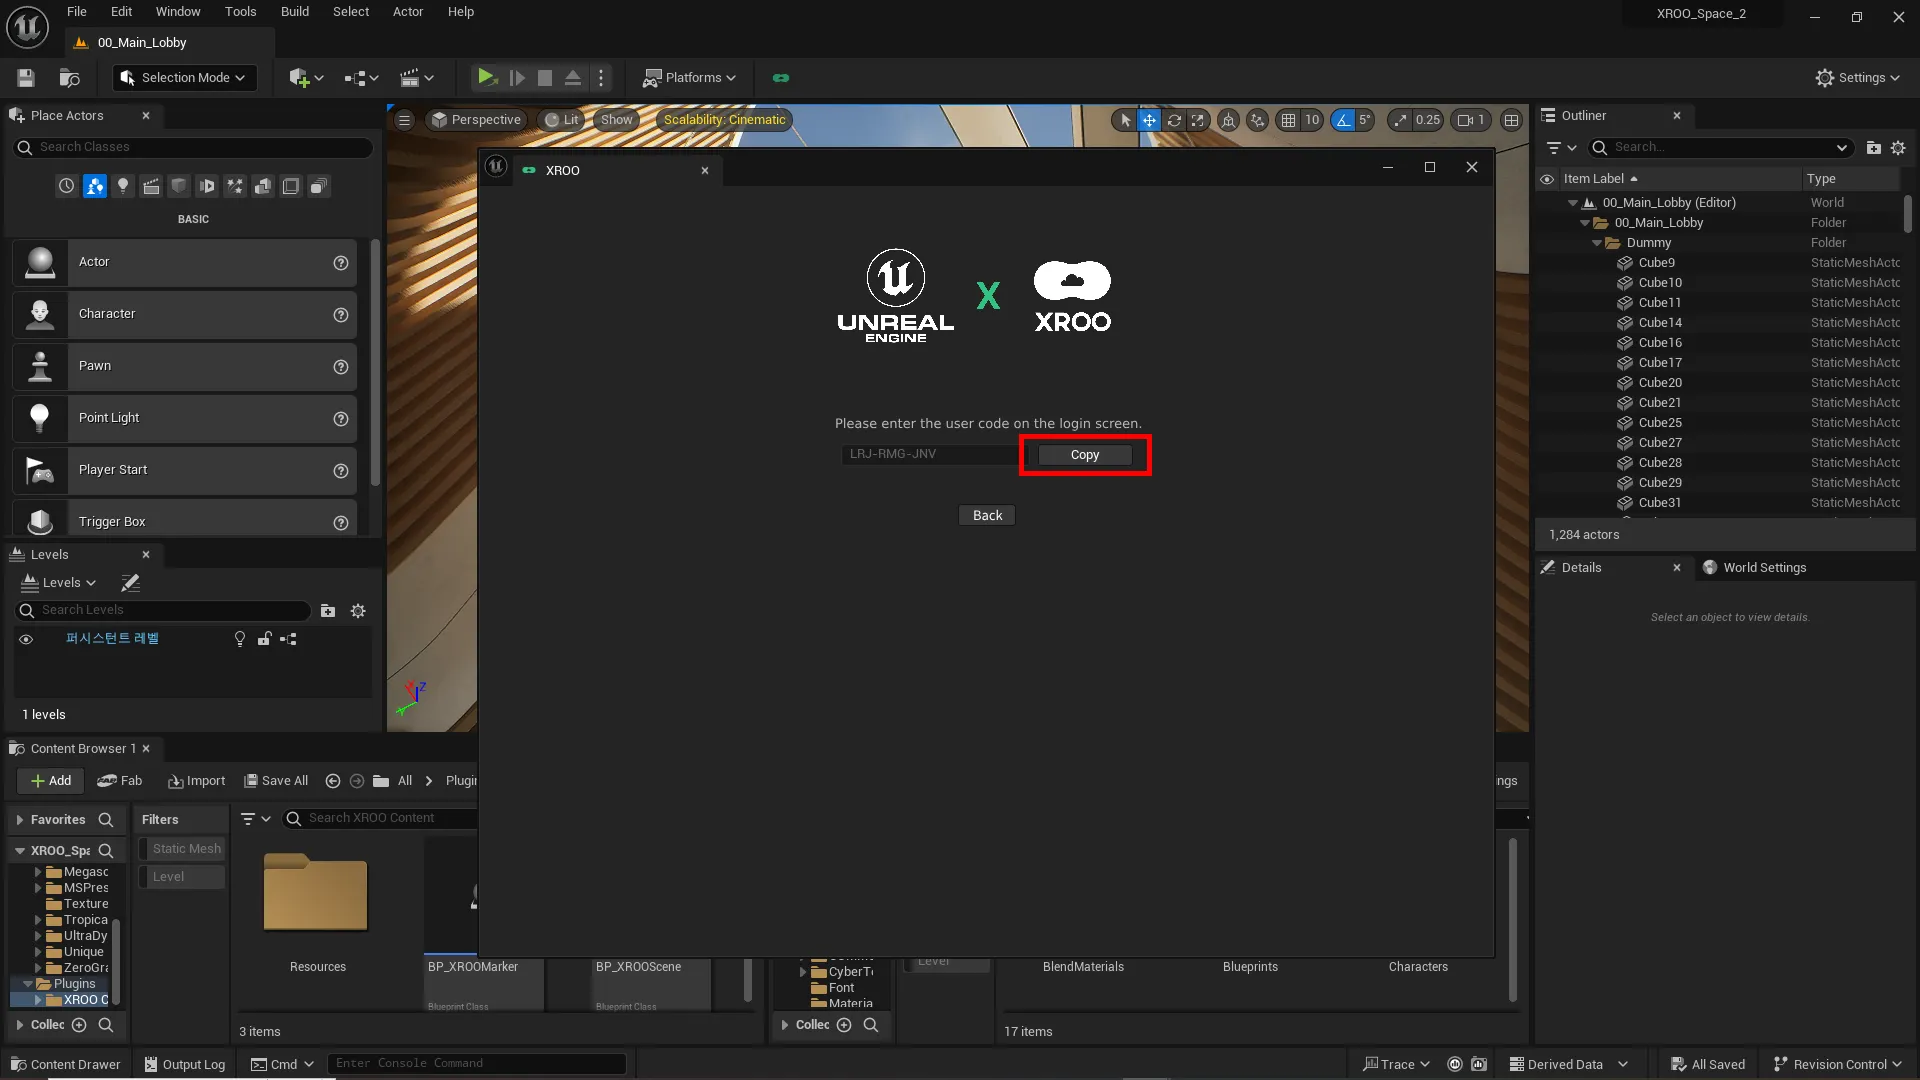
A user code is automatically generated each time you attempt to log in.
Guide to Sign in with Google
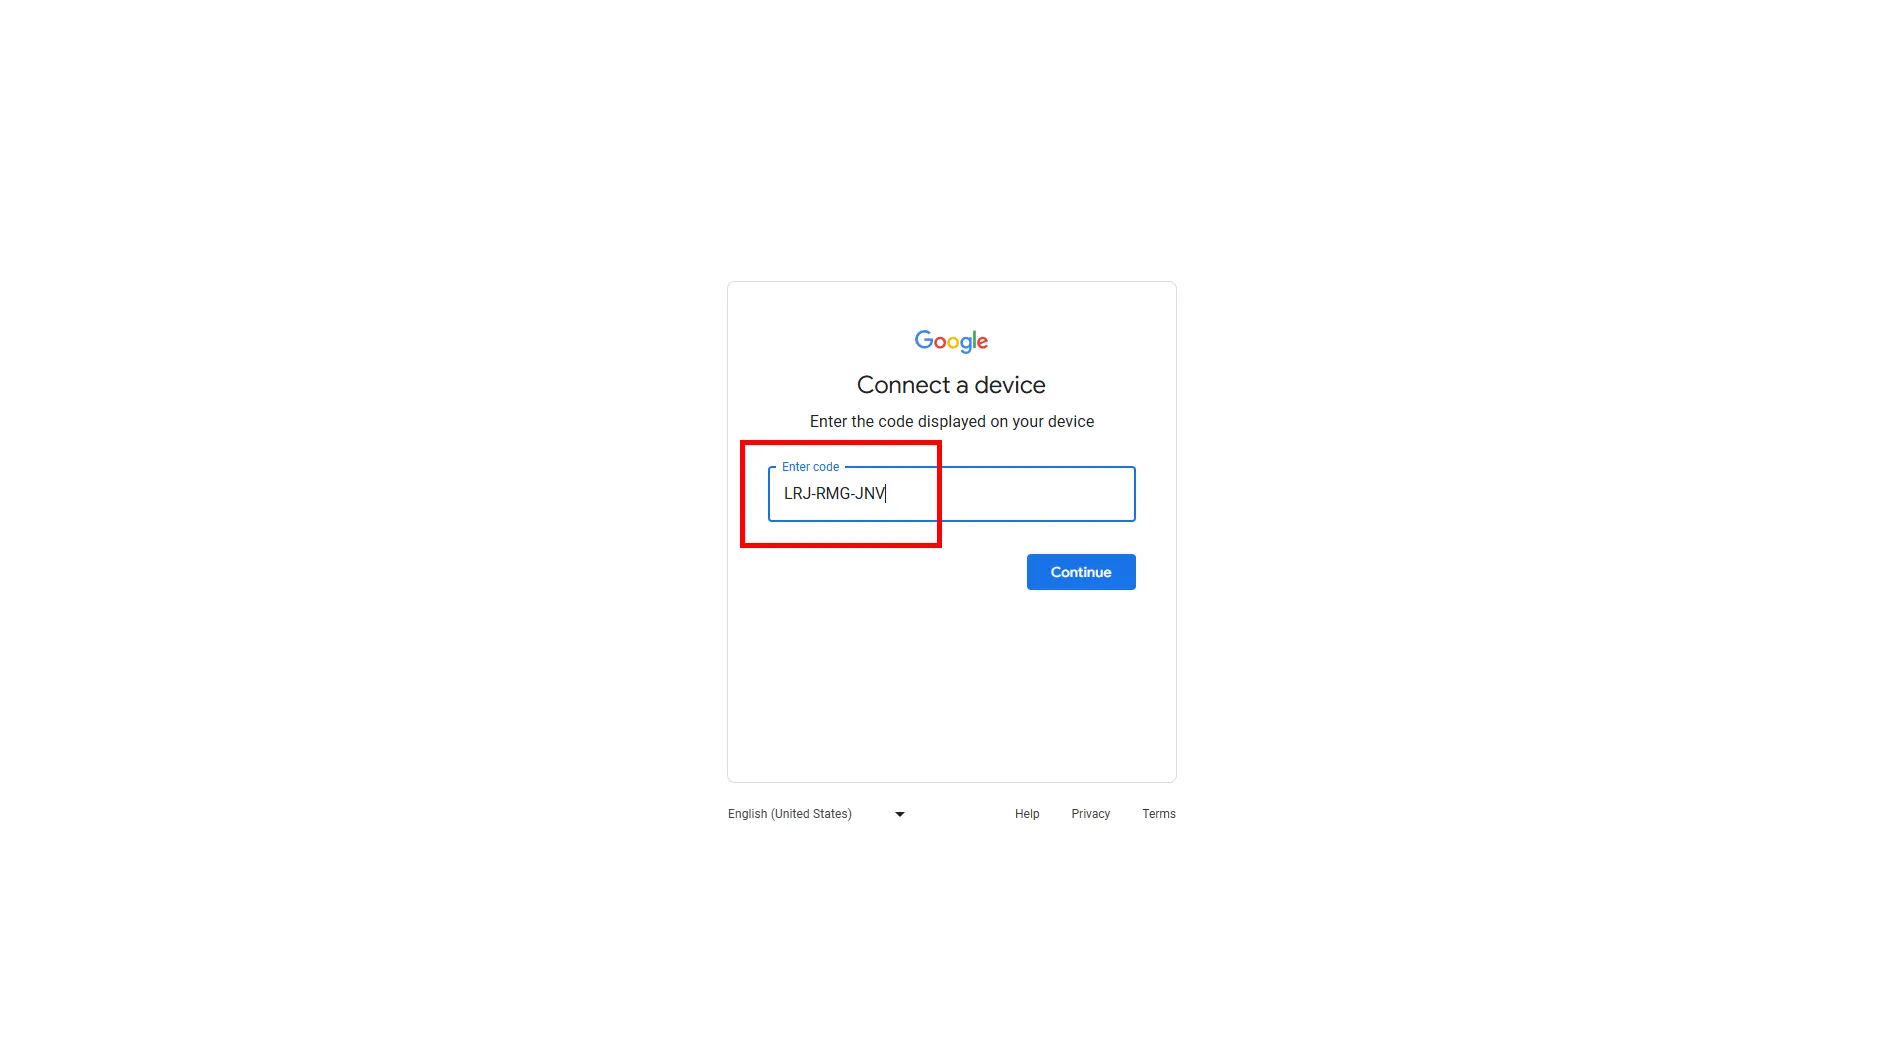
1. Click the "Sign in with Google" button in the login window.
2-1. Click the "Copy" button to copy the generated user code.
2-2. Enter the user code copied in step 2-1 into the user code entry page opened in the browser.
3. Once the validation is complete, the Google login account entry page will appear.
Enter the Google account you used to sign up for XROO and proceed with the login.
4. If your XROO membership information matches the login details, the plugin will be activated.
If you do not have a XROO creator account, please create an account by signing up.
2. Import & Export
Plugin ←→ XROO Data Synchronization
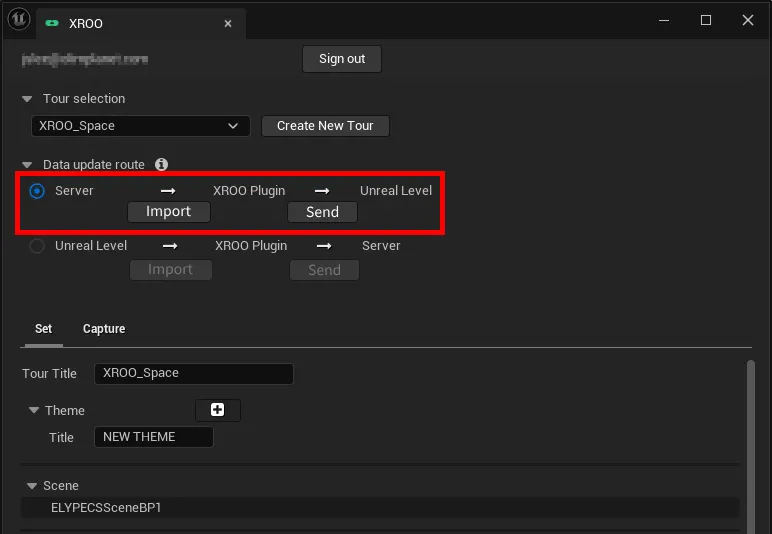
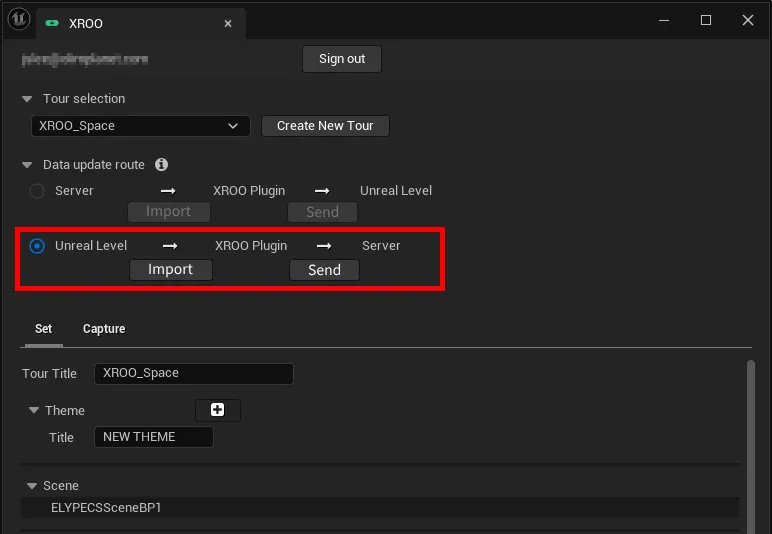
'Import' and 'Export' refer to choosing where to synchronize the user's updated work data between XROO's tours and the UE project.
Import: Synchronizing the changed work data from XROO tours to the UE project (XROO → Unreal)
Export: Synchronizing the changed work data from the UE project to the XROO tour (Unreal → XROO)
The direction of the arrows between each work environment indicates the direction of data movement.
•
If you want to update the data from the XROO tour to the UE level, click the right-facing arrow at the top (Import, then Export) to update.
•
If you want to update the data worked on in UE to the XROO tour, click the right-facing arrow at the bottom (Import, then Export) to update.
Important: For any update, you must first import (retrieve) the data from the location where the final change occurred using the plugin, and then perform the update (export). Please remember this!3. Create / Load
Create a New Tour and Edit an Existing Tour
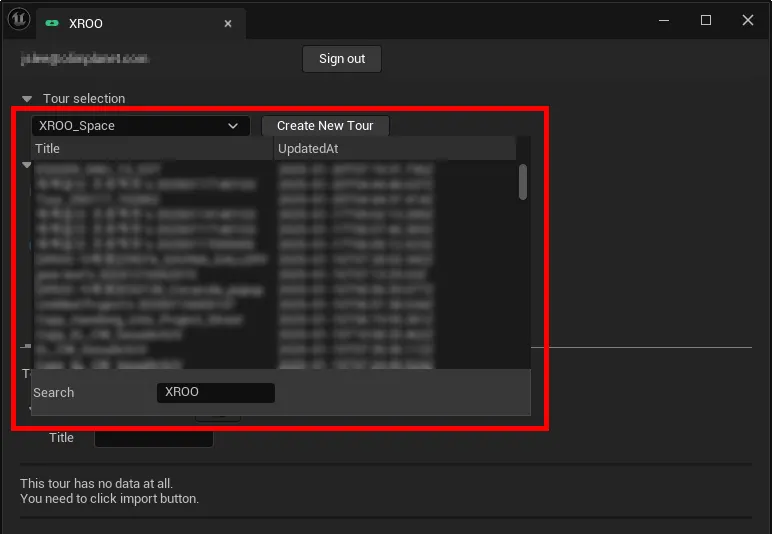
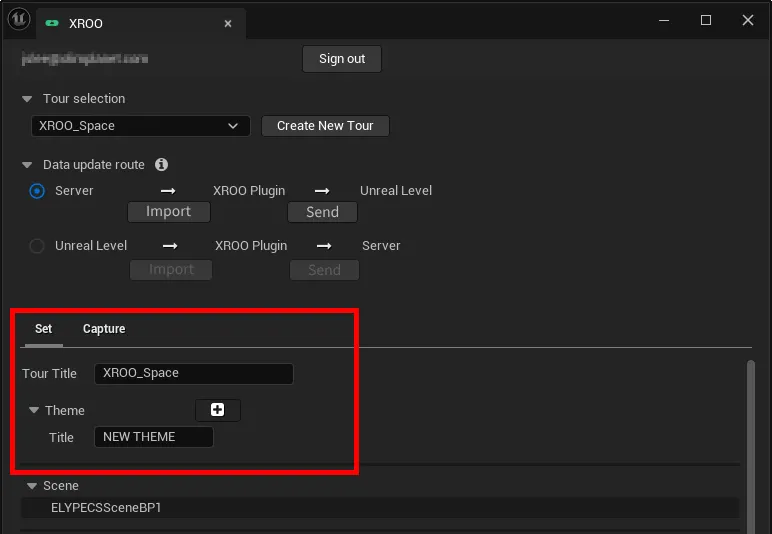
1. Tour Creation and Loading
Once you have logged in with your XROO account, you will see the screen where you can load or create a tour in the Tour selection tab as shown above.
• If you want to load a tour from the top tour list, click the desired tour in the list.
• To create a new tour, click "Create New Tour" on the right side of the list.
If you have created a new tour, you will see a pop-up that says "A new tour has been created.”
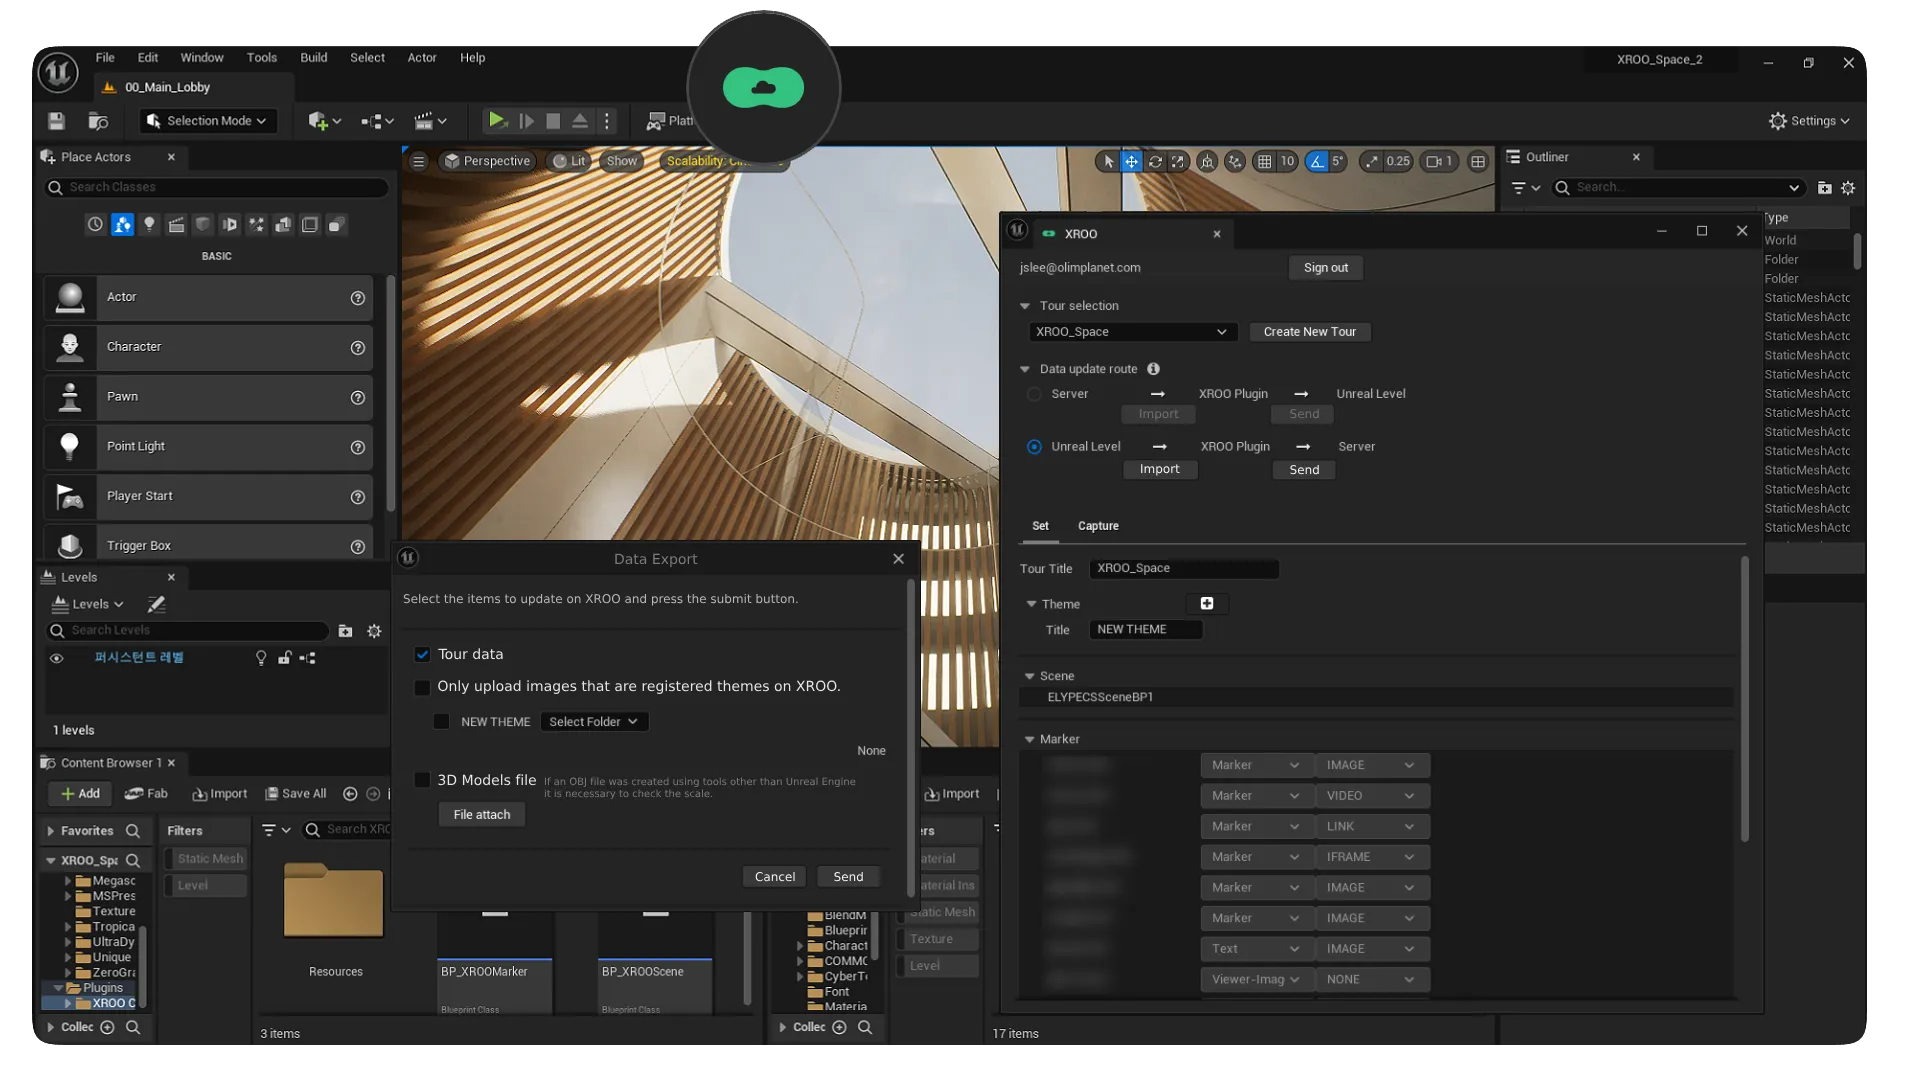
2. Enter Tour Basic Information
In the Set tab, enter the basic tour information such as Title and Theme. This information can also be modified later in XROO.
• Title : Please specify the title for the tour.
• Theme : If you want to set multiple scenes in one tour, click the plus icon on the right side of the title to add a new Theme. A Theme is similar to a 'sublevel' in UE.
4. Create Scene and Infospot (Marker)
Set up movement points and install Infospots (markers)
아이콘 타입 마커
Viewer Type Marker
1. Creating and Adjusting Scenes and Markers
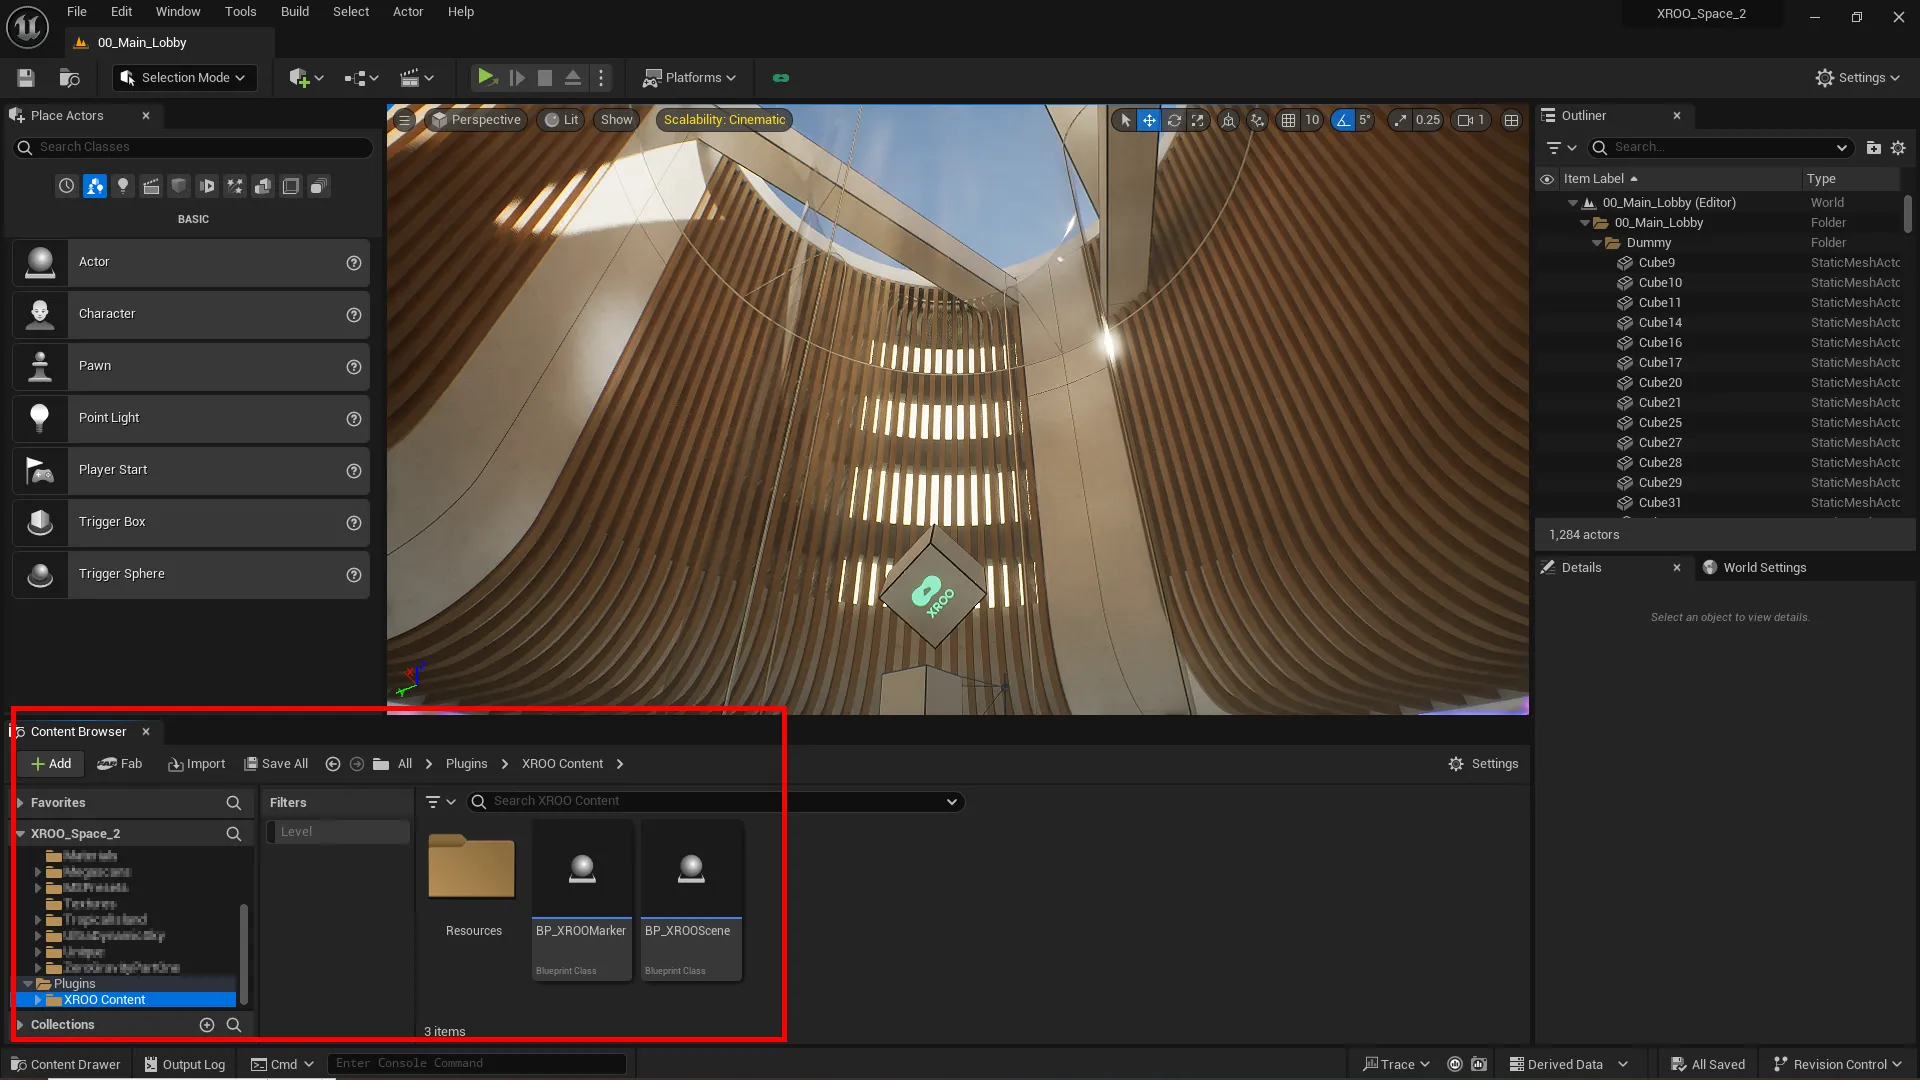
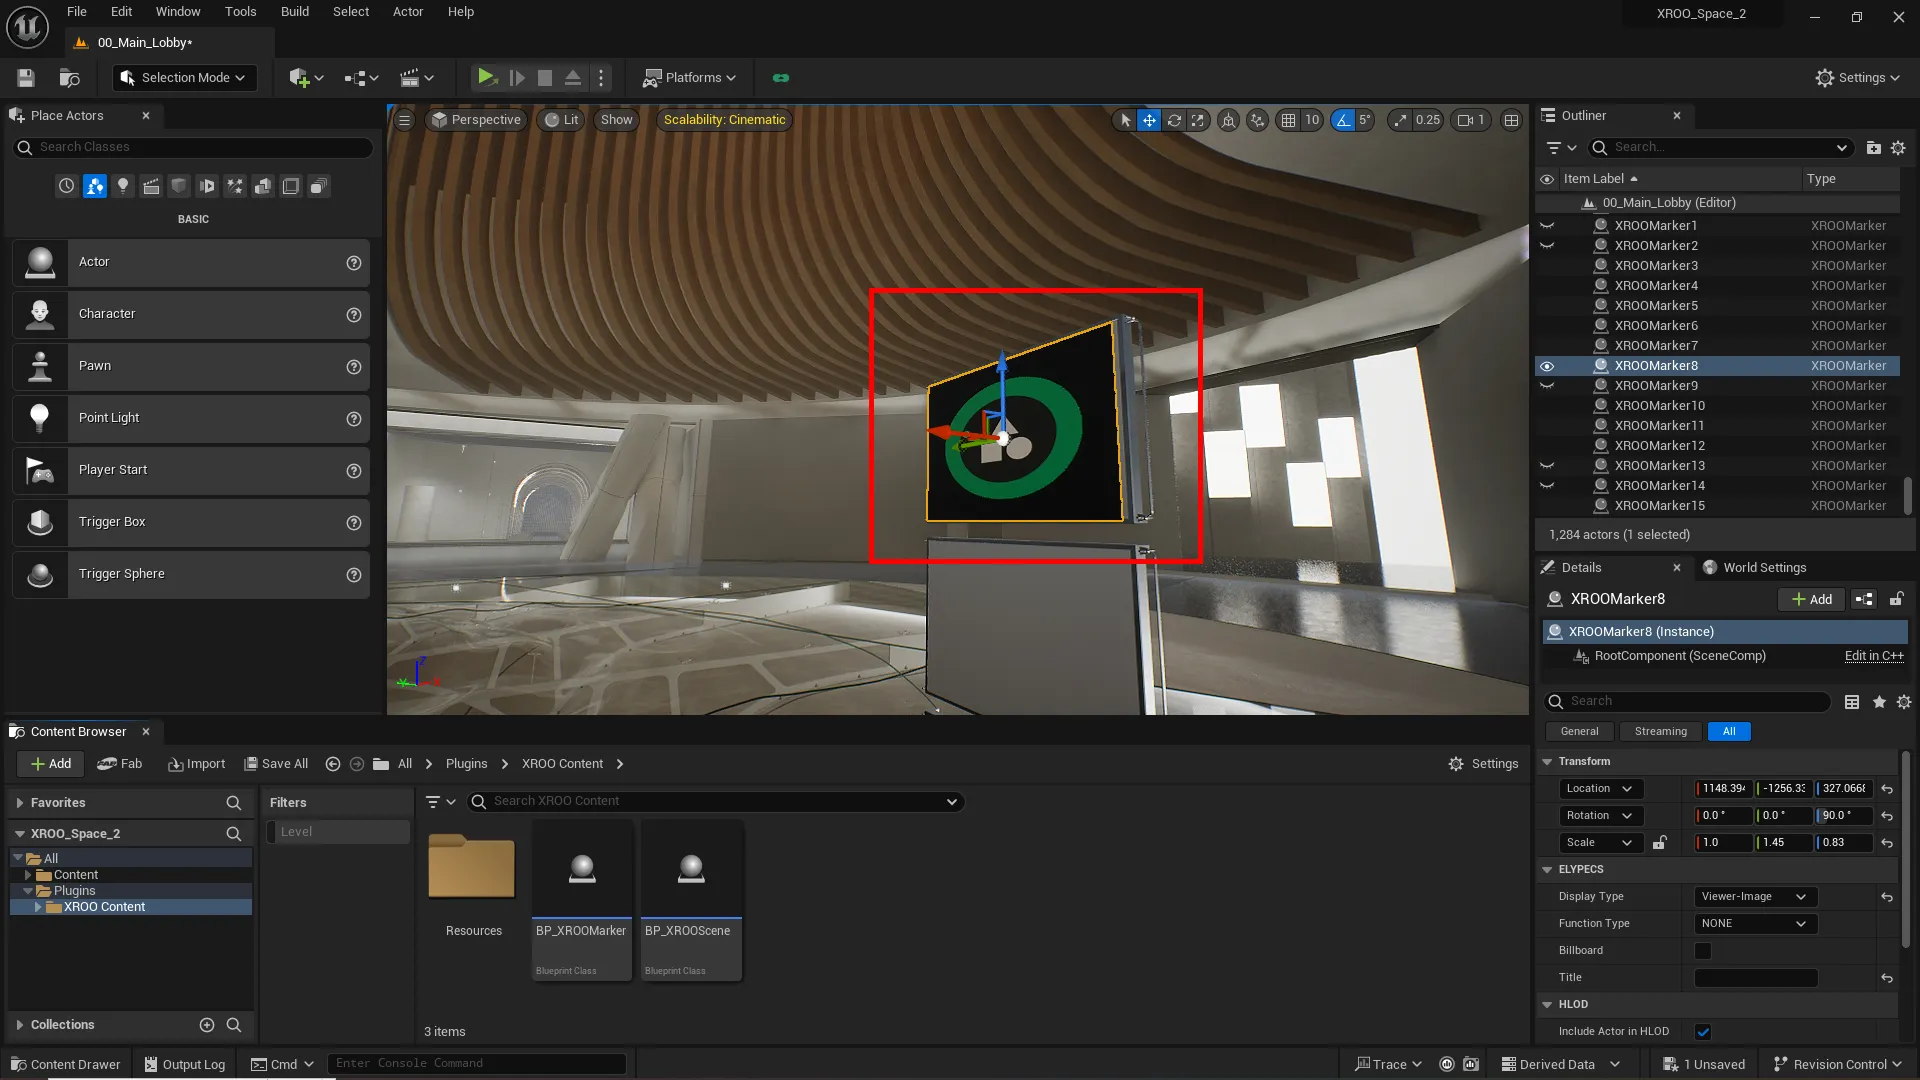
If the XROO plugin is installed correctly, you can see XROO content in the Content Browser.
You can use this content to create scenes and Infospot(markers) in the level.
Select "XROO Content" in the browser to find MarkerBP(Infospot) and SceneBP.
•
To add a scene, drag SceneBP, and to add an Infospot, drag MarkerBP to place them in the level.
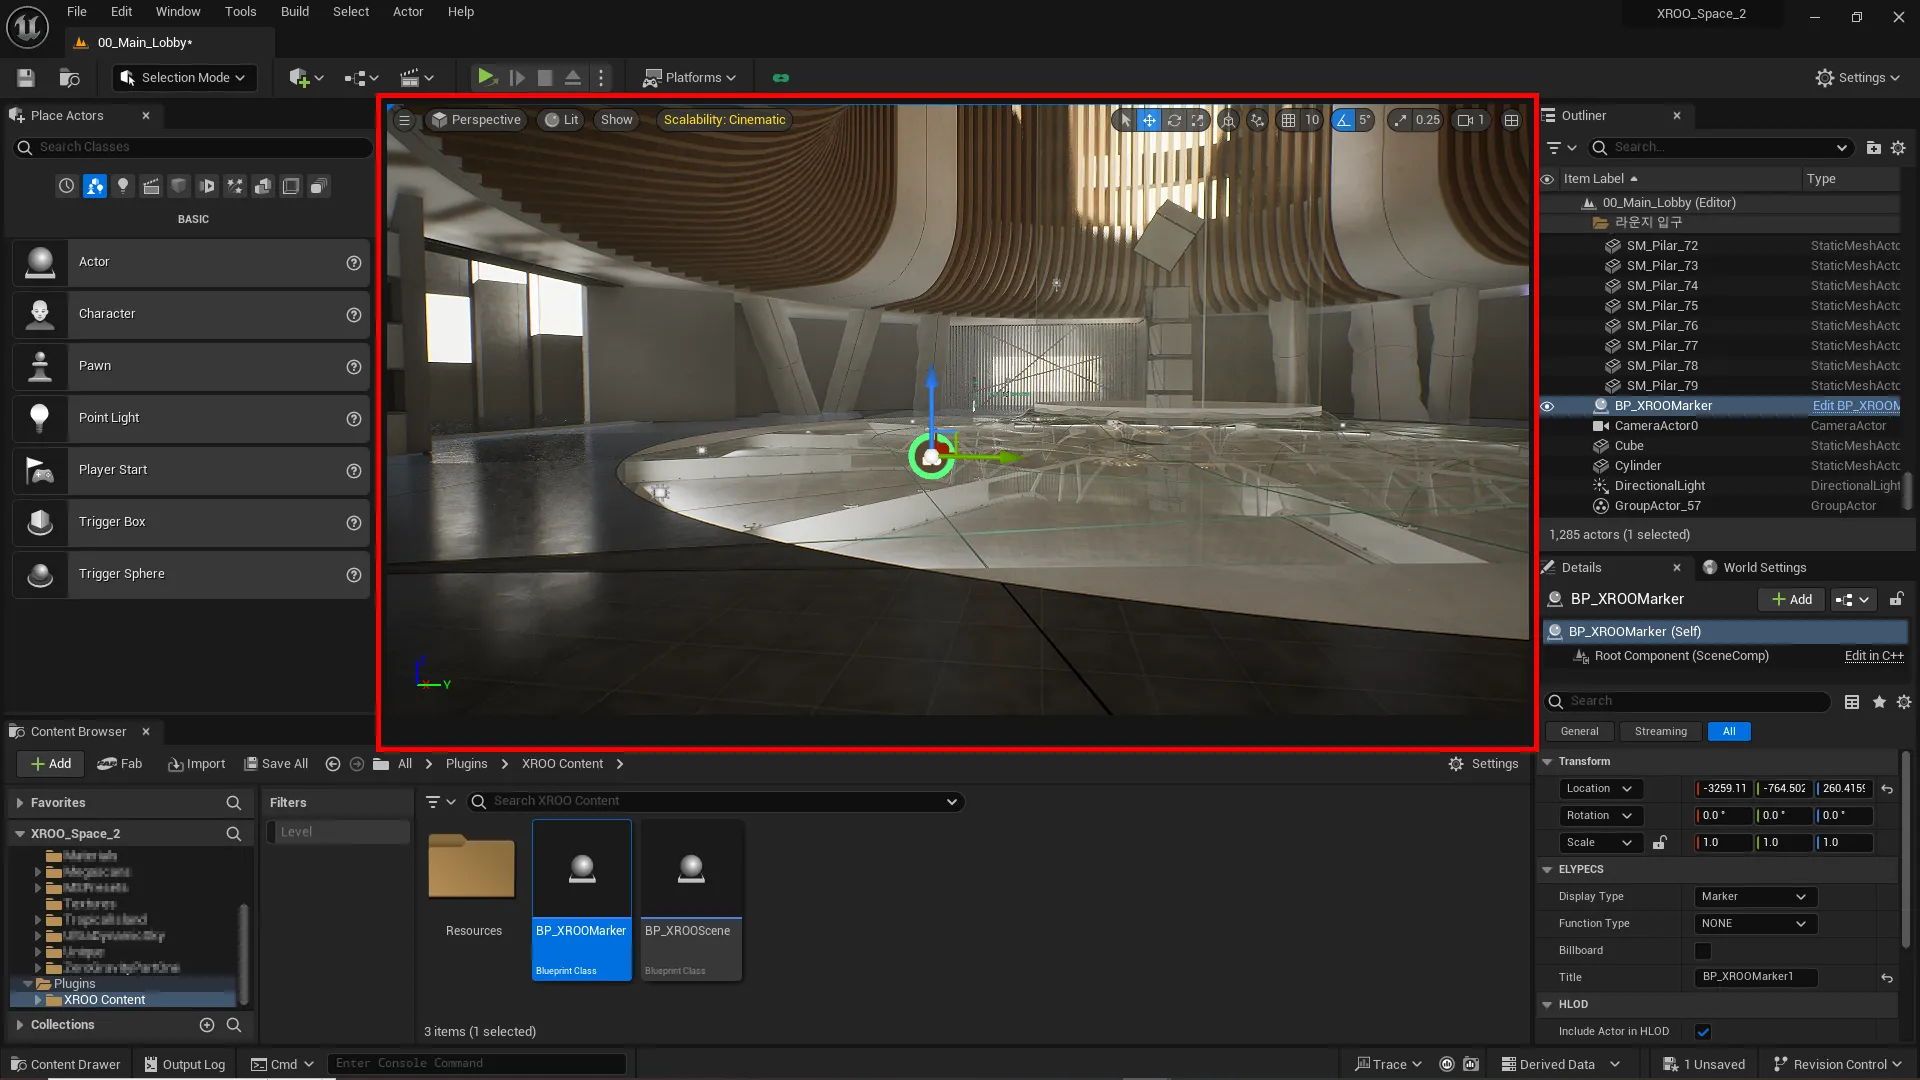
•
After adding content to the level, click the content and use the x, y, z axis arrows attached to move it, or change the position by adjusting the numbers in the Transform section of the Details panel.
•
Infospots (Markers) can be placed in several types within the space:
◦
Icon Type: You can display content in a popup format by clicking the button.
◦
Viewer Type: Displays content directly in the user’s space, like a frame, during exploration.
◦
Transparent Type: Creates a transparent area shaped like the object, and when the object is selected, the attached content appears in a popup format on the screen.
•
Infospot(Markers) can be added and their positions changed in the same way as scenes, by dragging them.
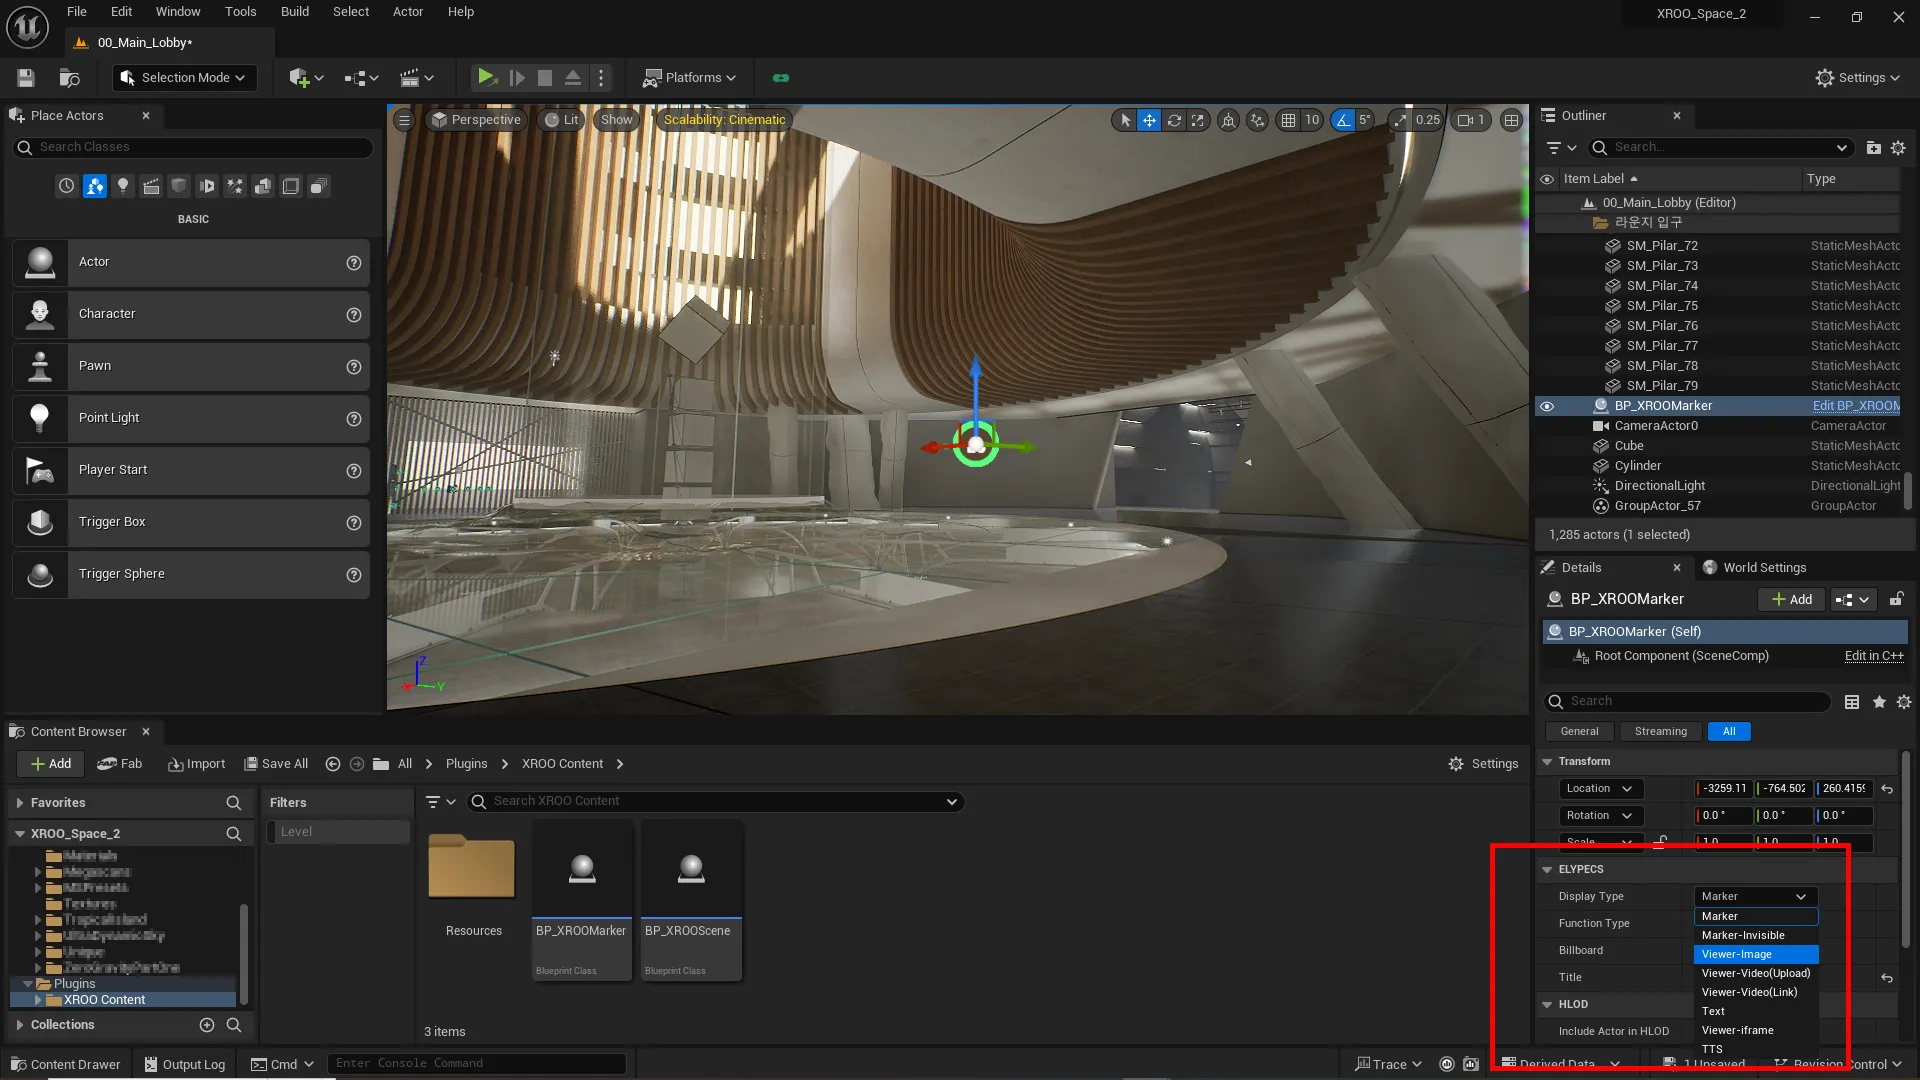
For Infospot(markers), you can change their properties in the Function Type section of the Details panel.
Infospot(markers) provided by XROO are elements that allow you to place and display content such as images, videos, PDFs, etc., in various ways within the space.
•
A brief introduction to the functions of each Infospot(marker) is as follows
- Icon: The Icon Infospot(Marker) has no additional functionality beyond displaying the icon. Use it when you only want to place an icon in the tour.
- Image: The Image Slider Infospot(Marker) allows you to display images in a slideshow format.
- Video: The Video Infospot(Marker) lets you display video content.
- Iframe: The iFrame Infospot(Marker) can display content such as custom HTML pages.
- Link: The Link Infospot(Marker) allows you to navigate to another page or open an external page in a new window when clicked.
- Portal: The Portal Infospot(Marker) facilitates smooth scene transitions within the tour.
- Marker-Invisible: The Transparent Infospot(Marker) creates an outline in the shape of an object to highlight it.
- Viewer-Image: The Image Viewer allows you to display images as if they were placed in the space.
- Viewer-Video: The Video Viewer allows you to display uploaded videos as if they were placed in the space.
- Viewer-Videolink: The Video Viewer allows you to display videos from links as if they were placed in the space.
For more detailed information on each marker, please refer to the "6. Module Creation and Modification" guide section!
The Infospot(Marker)'s function type can only be changed in UE.
In XROO, you can only adjust the Infospot(Marker)'s detailed settings and cannot change its original function type, so make sure you have selected the desired Infospot(Marker) module.
Try dragging the scene and Infospot(Marker) into the level and adjusting their positions through the steps above!
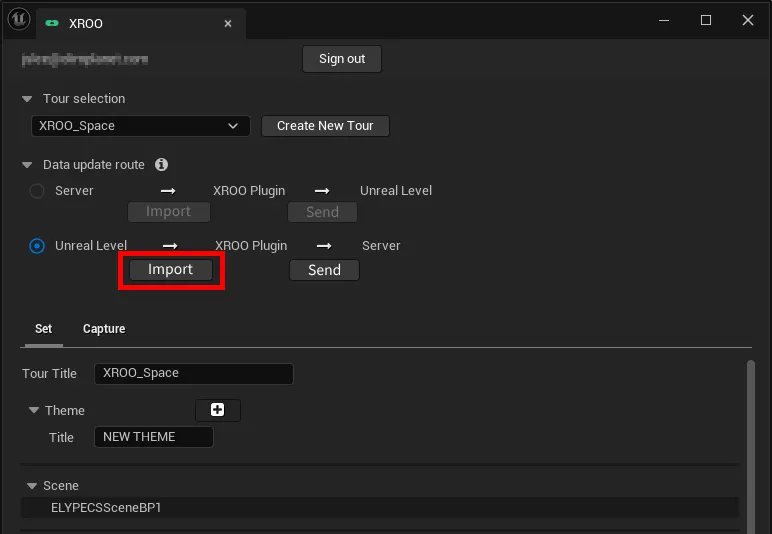
2. Import with the XROO Plugin
Once you have created and adjusted the scene and Infospot(markers), click the Import button to load the current level's information into the XROO plugin.
After the import is complete, you can check the updated Scene and Infospot(markers) information below the basic tour information.
Tip: This import process can be done either after first creating and adjusting the scene/Infospot(markers) and then logging in, or by logging in and creating the tour first, then creating and adjusting the scene/Infospot(markers) before performing the import.
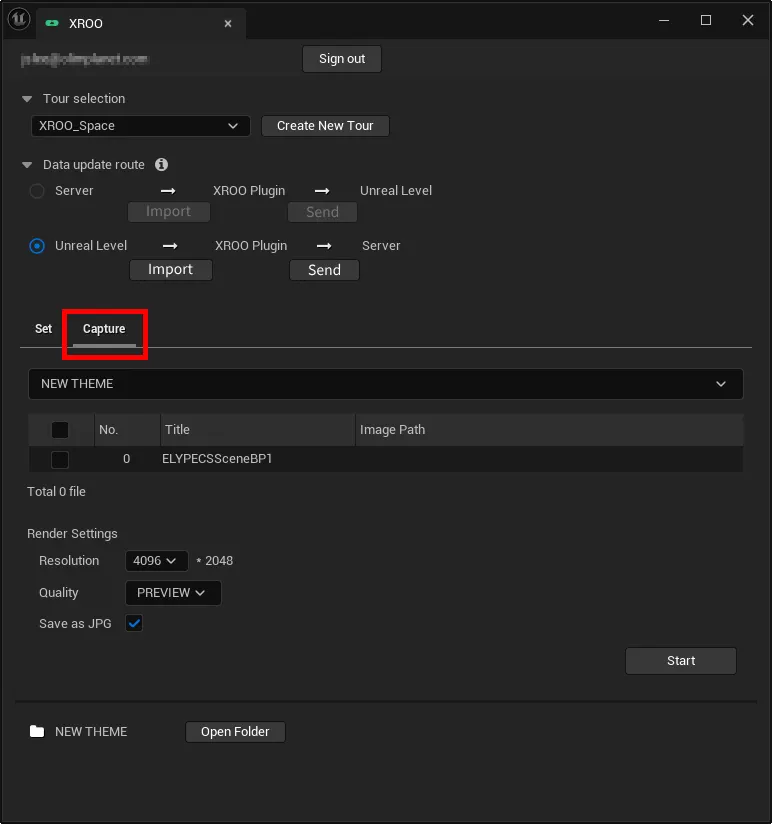
5. Scene Image Capture
Capture 360 Panorama Image Extraction
•
Once content creation and placement are complete, it's time to capture the scene.
1.
Go to the Capture tab in the XROO plugin window and select the scene you want to capture.
2.
Click "Start" in the Capture tab of the XROO plugin window to begin capturing the image of the created scene.
Resolution refers to the resolution of the images when extracting 360 images.
The final output is extracted at a resolution of "4096”.
Quality refers to the quality of the images when extracting 360 images.
It consists of four preset levels: Preview, Low, Middle, and High.
As the quality increases, the image quality improves, but it also takes more time to extract.
For XROO, even with the Low quality setting, you can achieve good 360 images in a reasonable time, so we recommend proceeding with Low.
If the "Save JPG" checkbox is checked, the 360 images will be extracted in JPG format to the theme folder where the capture is being performed.
XROO supports uploading scene images with the JPG file extension, so make sure the checkbox is checked when proceeding.
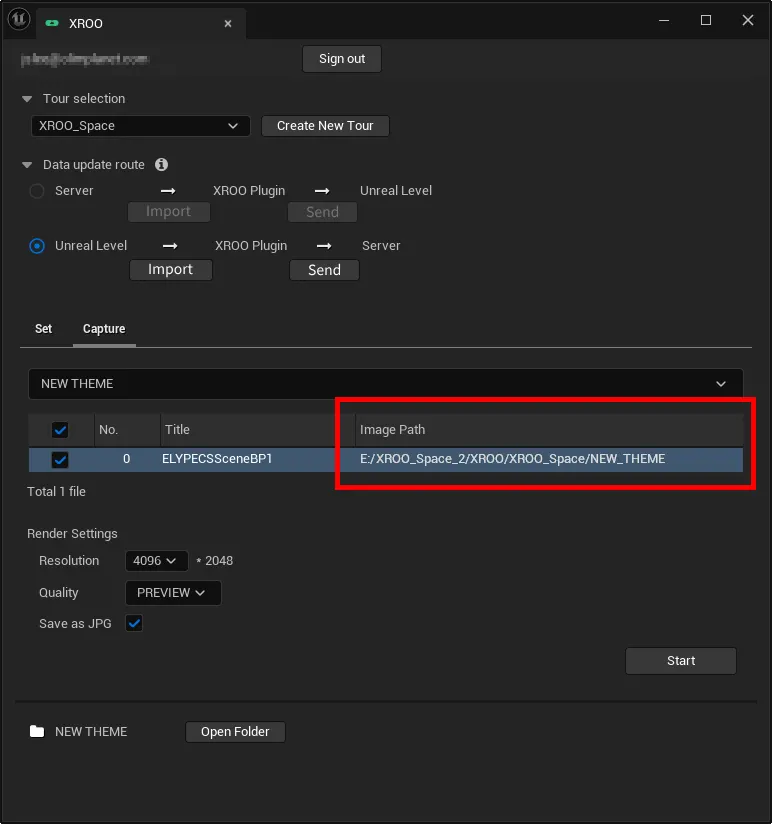
•
The captured images are automatically saved to the default path, and the progress can be monitored at the top left of the level screen.
•
You can confirm that the capture is complete through the "Image capture is complete" pop-up.
6. Export
Export Data
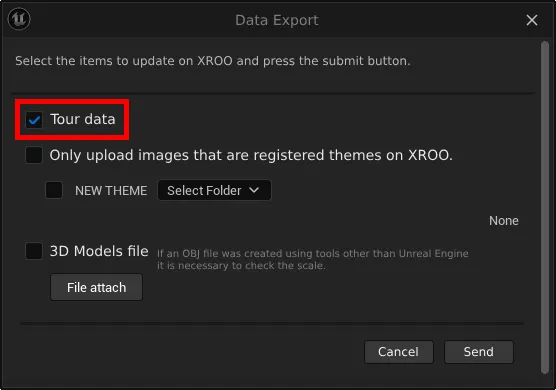
After confirming the pop-up above, proceed with sending the data.
•
Update Tour Information
1.
First, update the tour data.
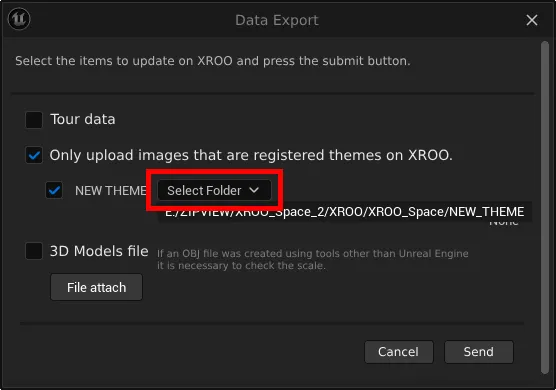
You need to update the tour data first in order to update the information for image files and 3D models.2. Upload the capture images for each scene of the level.
Check the Theme you want to update with the capture images and select the folder where the capture image files are stored.
After selecting the path, click "Upload" to prepare for the image upload.
During the upload process, you can check the remaining number of images to be uploaded at the top of the button.
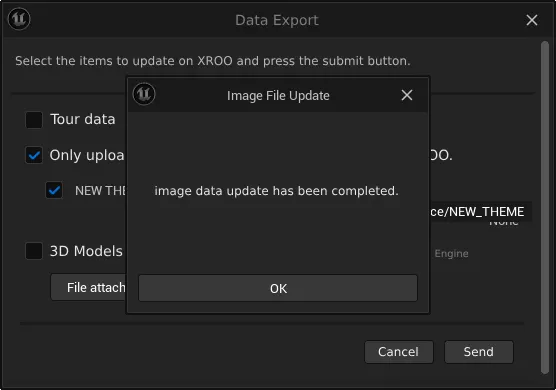
•
Once the image upload is complete, you will see the "Image data update is complete" pop-up.
Export Modeling Data
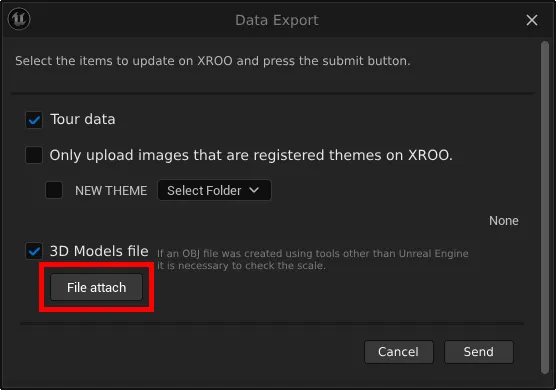
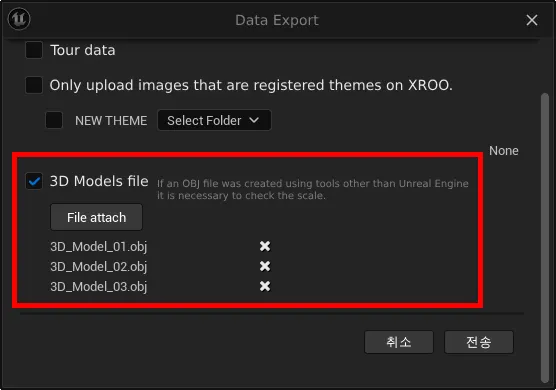
•
Upload the modeling data for the level.
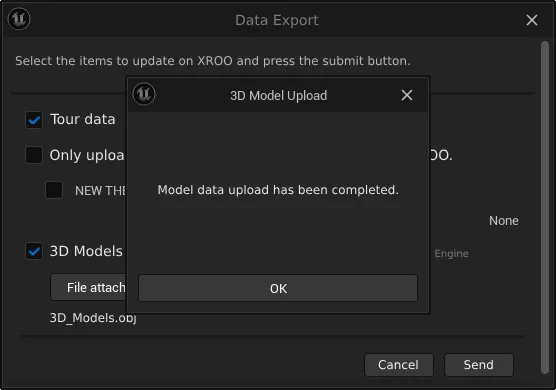
The modeling files must be saved in OBJ file format.•
Click the Attach button, select the saved modeling OBJ file, and update it.
•
Once the model data upload is complete, you will see the "Model data upload is complete" pop-up as shown above.
7. XROO User Interface
Check the tour & work history on the XROO website.
•
Let's check the work done in UE through the XROO website.
•
Log in with the same account used for logging into UE.
•
Once logged in, click the "Start for Free" button to prepare for importing the data exported from the plugin.
•
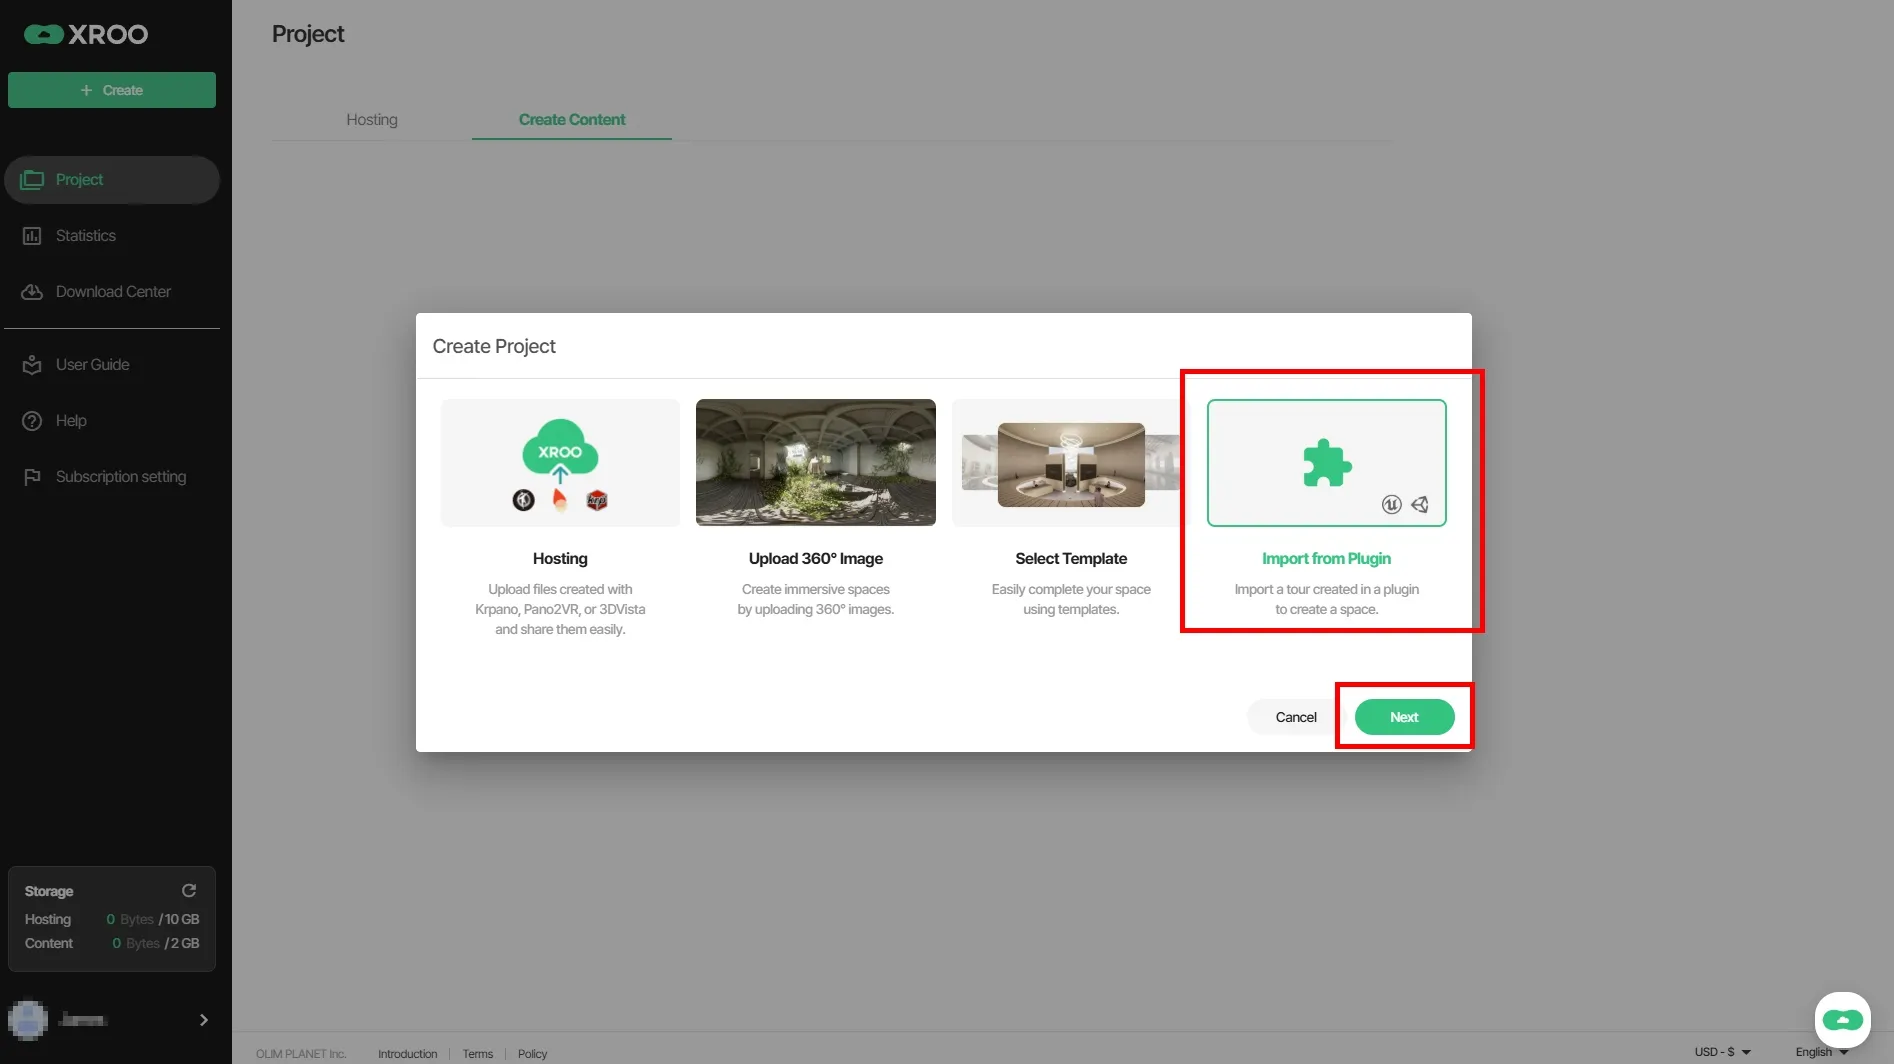
Select "Import in the plugin”, and click the "Next" button to proceed to the next step.
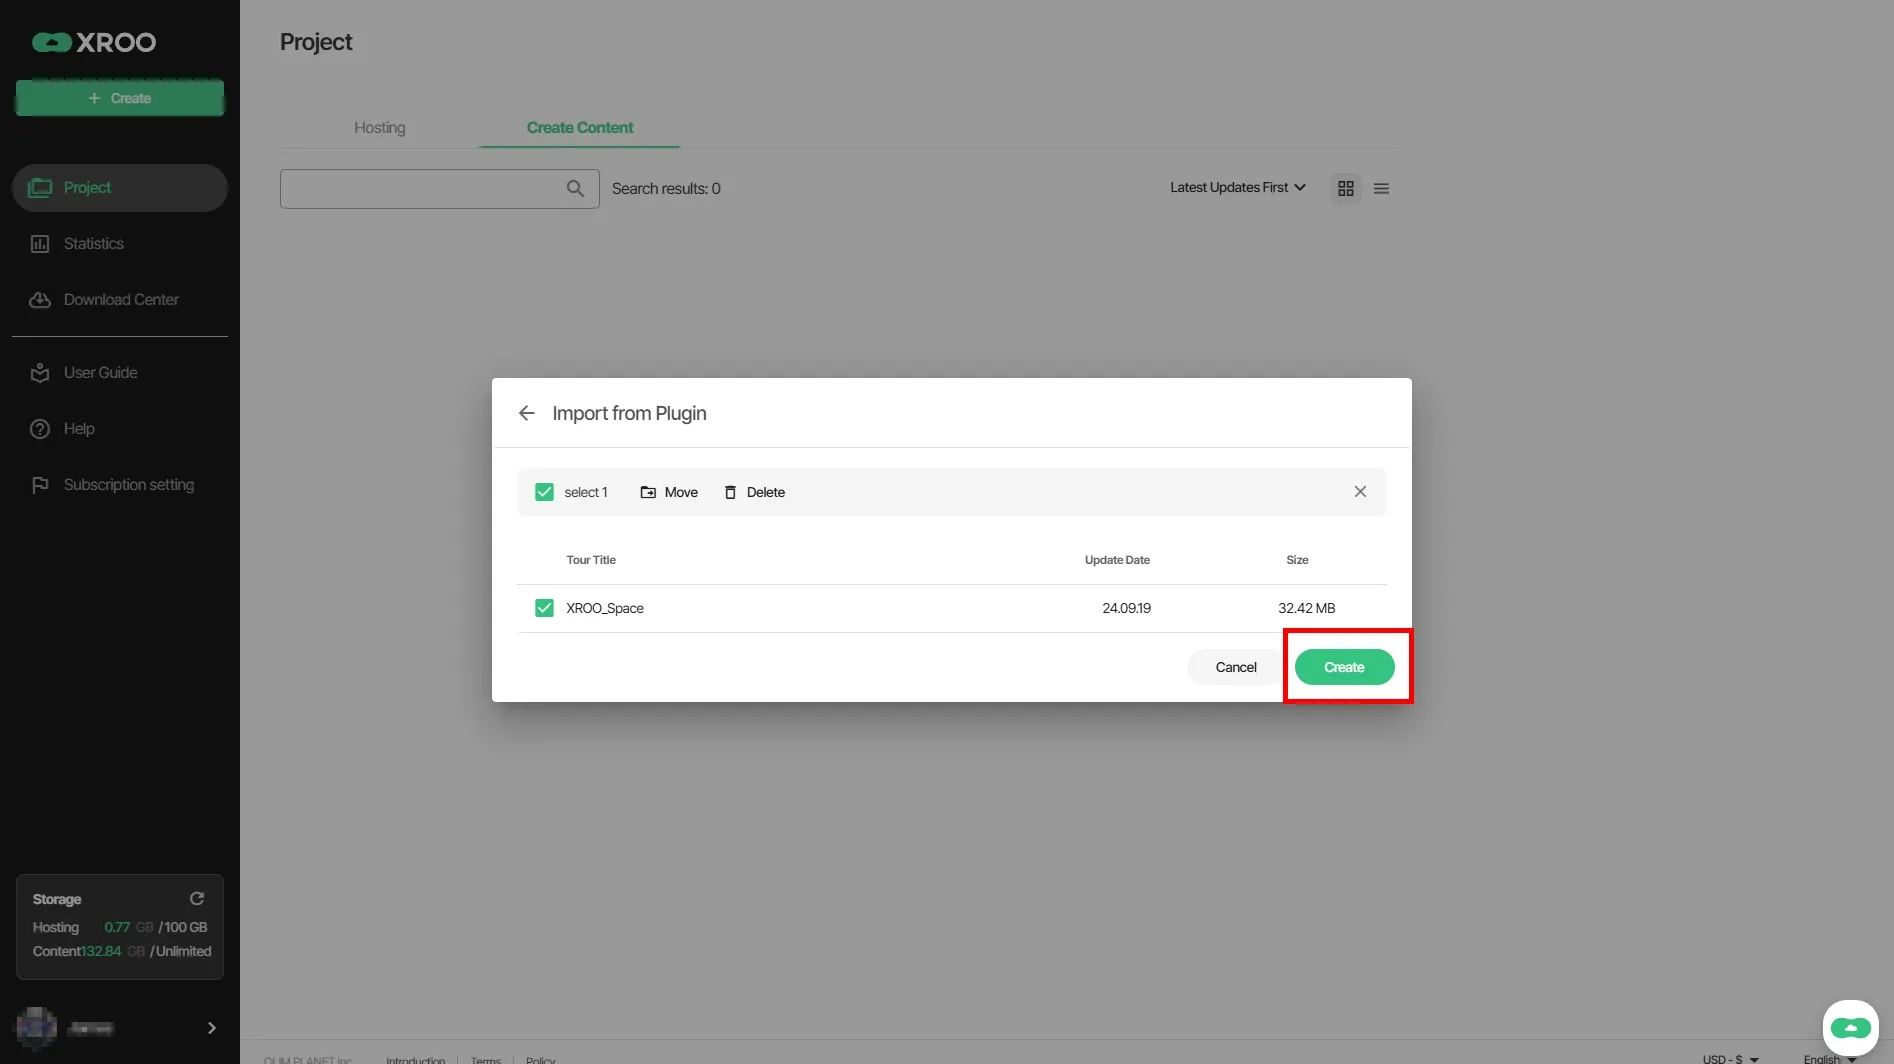
•
Review the tour data exported from the plugin and complete the creation process.

•
In the space editing screen, you can confirm that the 3D models uploaded through Unreal Engine are properly represented with keymaps, and that the content elements worked on in Unreal Engine are correctly displayed.
Through the Scene List, you can see the scenes and 360 images set in the plugin.
Guideline for Applying Individual Modeling Based on Multiple Themes
•
When you click "Send to XROO" in the XROO plugin, a pop-up will appear allowing you to select the items to update and send.
•
You can upload the modeling files, and if you upload a file with the same name, the existing file will be replaced by the newly uploaded file. Please check the file name before uploading.
•
Once the upload is complete, the uploaded file names will be displayed in the list at the bottom. If you wish to delete a file, click the "X" button on the right to remove it.
•
If you wish to delete a file, click the "X" button on the right to remove it.
•
Upload the appropriate modeling files for each theme, and either send all files or select the files you want to check in XROO, then click "Send" to transfer the data to XROO.
•
After the data transfer is complete, log in to XROO and use the Set Theme modal in the Import page to match the uploaded modeling files with the appropriate themes.